I'm originally from Canada. I love living on our farm here in Tipperary, but sometimes I feel a little bit homesick. When I miss home, the easiest thing for me to do is bake and cook. Food has a great way of transporting us to memories and places. It connects us with loved ones through tradition, flavours and texture. Sometimes, even the act of making a recipe you know so well; one you've been making since you were a child, is enough to help stave that feeling of homesickness.
In my part of Canada, scones are considered a sweet treat, while buttermilk biscuits are more of what we would consider an Irish scone. In Canada, biscuits can be eaten sweet, with jam and butter, or savoury – usually buttered, with beans, seafood chowder or soup. Scones are usually flavoured with fruit, like blueberries, and topped with a sprinkling of sugar or a light glaze. They're large, often triangular or rectangular in shape, and can be eaten on their own or buttered; served with a cup of coffee.
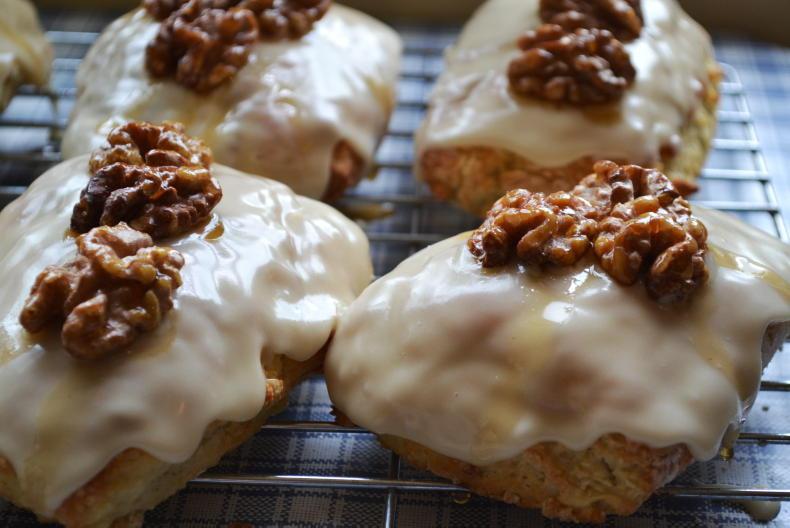
I like my scones with a glaze. This recipe incorporates one of my favourite flavour combinations: maple and walnut. At home, maple walnut is a popular ice cream flavour. It's not too sweet, has good texture from the walnuts and the scone itself is nice and crumbly.
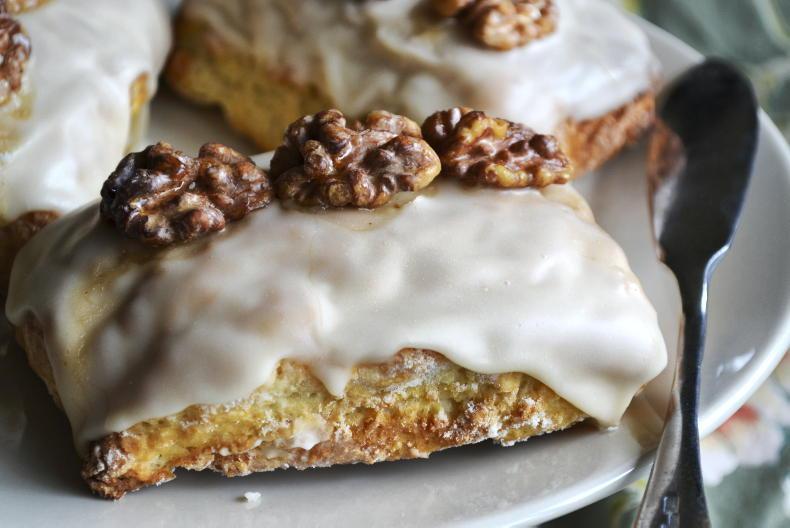
These North American-style maple walnut scones are crumbly, sweet and go well with a hot cup of coffee. \ Janine Kennedy
Canadian-style maple walnut scones
Serves 10-12
Ingredients:
For the scones:
320g plain flour
100g chopped walnuts
1 tbsp baking powder
1 tsp salt
60g light brown sugar
125g cold butter, cubed
1 large egg
2 tsp vanilla extract
250ml cold buttermilk
For the glaze:
500g Icing Sugar
1 tsp vanilla or maple extract
3 tbsp maple syrup
Splash of heavy cream
Toasted walnuts, soaked in maple syrup (to garnish)
Directions:
1. Preheat your oven to 200°C. Line one or two baking sheets with parchment and set aside.
2. In a large bowl, combine the flour, walnuts, baking powder, salt, brown sugar and cold, cubed butter.
3. Using your fingers, rub the butter into the dry ingredients until the mixture resembles coarse crumbs. Make a well in the centre of the mixture.
4. In a large measuring cup, measure out the buttermilk, then add the egg and vanilla. Whisk to combine.
5. Add the wet ingredients to the well in the middle of the dry ingredients. Using a wooden spoon or just using your hands (your best pastry tool!) mix the wet into the dry until just combined (mixture should be on the wet side – if it’s dry and crumbly, add a splash more buttermilk).
7. On a lightly floured surface, turn the dough out and knead lightly to form a ball. Rest the dough for 15 minutes.
8. Using more flour (for dusting) and a rolling pin, roll the dough out into a thick rectangle (you want to get 8-10 scones out of this dough at most). It should be at least 4-5cm thick.
9. Cut the rectangle into 8-10 smaller rectangles or triangles. Transfer to the prepared baking sheets.
10. Bake the scones for 20-25 minutes. Cool on a wire rack.
11. Make the glaze: in a mixing bowl, combine the icing sugar, maple syrup, maple extract (or vanilla) and about a tablespoon of heavy cream. You want the glaze to be thick, but still be able to drizzle it over the scones. If the glaze is too thick for your liking, loosen it up with a bit more cream.
12. Dunk the tops of each scone in the glaze, or spoon the glaze over each scone allowing the excess to drip down the sides. Top with toasted maple-soaked walnuts. Allow glaze to set slightly before eating (if you can wait that long).
13. The scones will keep no longer than two days, so make sure you eat them right away!
I'm originally from Canada. I love living on our farm here in Tipperary, but sometimes I feel a little bit homesick. When I miss home, the easiest thing for me to do is bake and cook. Food has a great way of transporting us to memories and places. It connects us with loved ones through tradition, flavours and texture. Sometimes, even the act of making a recipe you know so well; one you've been making since you were a child, is enough to help stave that feeling of homesickness.
In my part of Canada, scones are considered a sweet treat, while buttermilk biscuits are more of what we would consider an Irish scone. In Canada, biscuits can be eaten sweet, with jam and butter, or savoury – usually buttered, with beans, seafood chowder or soup. Scones are usually flavoured with fruit, like blueberries, and topped with a sprinkling of sugar or a light glaze. They're large, often triangular or rectangular in shape, and can be eaten on their own or buttered; served with a cup of coffee.
I like my scones with a glaze. This recipe incorporates one of my favourite flavour combinations: maple and walnut. At home, maple walnut is a popular ice cream flavour. It's not too sweet, has good texture from the walnuts and the scone itself is nice and crumbly.
These North American-style maple walnut scones are crumbly, sweet and go well with a hot cup of coffee. \ Janine Kennedy
Canadian-style maple walnut scones
Serves 10-12
Ingredients:
For the scones:
320g plain flour
100g chopped walnuts
1 tbsp baking powder
1 tsp salt
60g light brown sugar
125g cold butter, cubed
1 large egg
2 tsp vanilla extract
250ml cold buttermilk
For the glaze:
500g Icing Sugar
1 tsp vanilla or maple extract
3 tbsp maple syrup
Splash of heavy cream
Toasted walnuts, soaked in maple syrup (to garnish)
Directions:
1. Preheat your oven to 200°C. Line one or two baking sheets with parchment and set aside.
2. In a large bowl, combine the flour, walnuts, baking powder, salt, brown sugar and cold, cubed butter.
3. Using your fingers, rub the butter into the dry ingredients until the mixture resembles coarse crumbs. Make a well in the centre of the mixture.
4. In a large measuring cup, measure out the buttermilk, then add the egg and vanilla. Whisk to combine.
5. Add the wet ingredients to the well in the middle of the dry ingredients. Using a wooden spoon or just using your hands (your best pastry tool!) mix the wet into the dry until just combined (mixture should be on the wet side – if it’s dry and crumbly, add a splash more buttermilk).
7. On a lightly floured surface, turn the dough out and knead lightly to form a ball. Rest the dough for 15 minutes.
8. Using more flour (for dusting) and a rolling pin, roll the dough out into a thick rectangle (you want to get 8-10 scones out of this dough at most). It should be at least 4-5cm thick.
9. Cut the rectangle into 8-10 smaller rectangles or triangles. Transfer to the prepared baking sheets.
10. Bake the scones for 20-25 minutes. Cool on a wire rack.
11. Make the glaze: in a mixing bowl, combine the icing sugar, maple syrup, maple extract (or vanilla) and about a tablespoon of heavy cream. You want the glaze to be thick, but still be able to drizzle it over the scones. If the glaze is too thick for your liking, loosen it up with a bit more cream.
12. Dunk the tops of each scone in the glaze, or spoon the glaze over each scone allowing the excess to drip down the sides. Top with toasted maple-soaked walnuts. Allow glaze to set slightly before eating (if you can wait that long).
13. The scones will keep no longer than two days, so make sure you eat them right away!


 This is a subscriber-only article


SHARING OPTIONS: