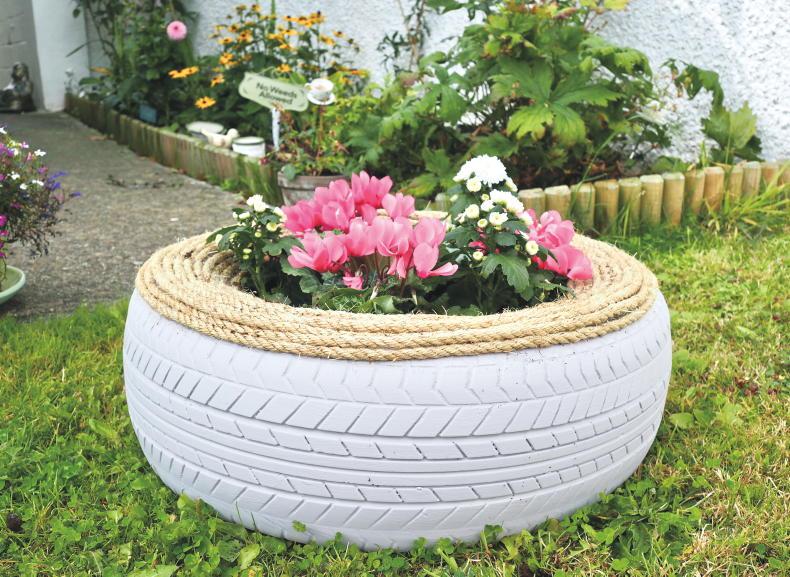
Millions of car tyres become unusable each year – they’re difficult to recycle as they contain metals and chemicals that are harmful to the environment when burnt. You can pick them up for a few Euro (or free) on second-hand websites.
Some gardeners use tyres to make raised beds in their borders, which is a great idea. Another lovely way to repurpose one is to create a planter for your garden.
It is believed the chemicals from tyres only release when they are burnt or slowly over time; still, I prefer to use my tyre for annuals and perennials rather than edible plants like herbs and vegetables.
For the past few years, I have a wildflower mix thriving in my tyre planter. It makes a pretty floral display and provides food for the bees and other insects.
What you need
Two tyres Power washer (optional) Wire brush and soapy water Piece of wood Jigsaw or hand saw Drill Screws suitable for outdoor use Legs or castors (optional) Recycled plastic Method
1 Choose two tyres of the same size. Before turning them into planters, give the tyres a deep clean. A blast of a power washer is ideal, but you can also use a wire brush and warm, soapy water to remove any built-up grime and grease.
2 To create a base, trace the round shape of the tyre onto a piece of wood. Carefully cut the wood using a jigsaw or hand saw.
3 Drill the wooden base into the rubber tyre using a drill and screws. Drill a hole in the base to create drainage in your planter.
4 You can add legs or castor wheels to your planter to raise it off the ground. You can stack two tyres or you can use only one. If stacking the tyres, secure them to each other by screwing the inner walls of each tyre together.
5 Use recycled plastic to line the planter and protect the wood from rotting. I used old plastic bags – just make sure to check them for holes beforehand.
6 Fill with a mix of peat-free compost, organic matter and add some vermiculite or grit for drainage.
Have fun with your floral display. Why not plant some tulips and daffodils for spring colour, or some dahlias for a late summer or early autumn bloom?
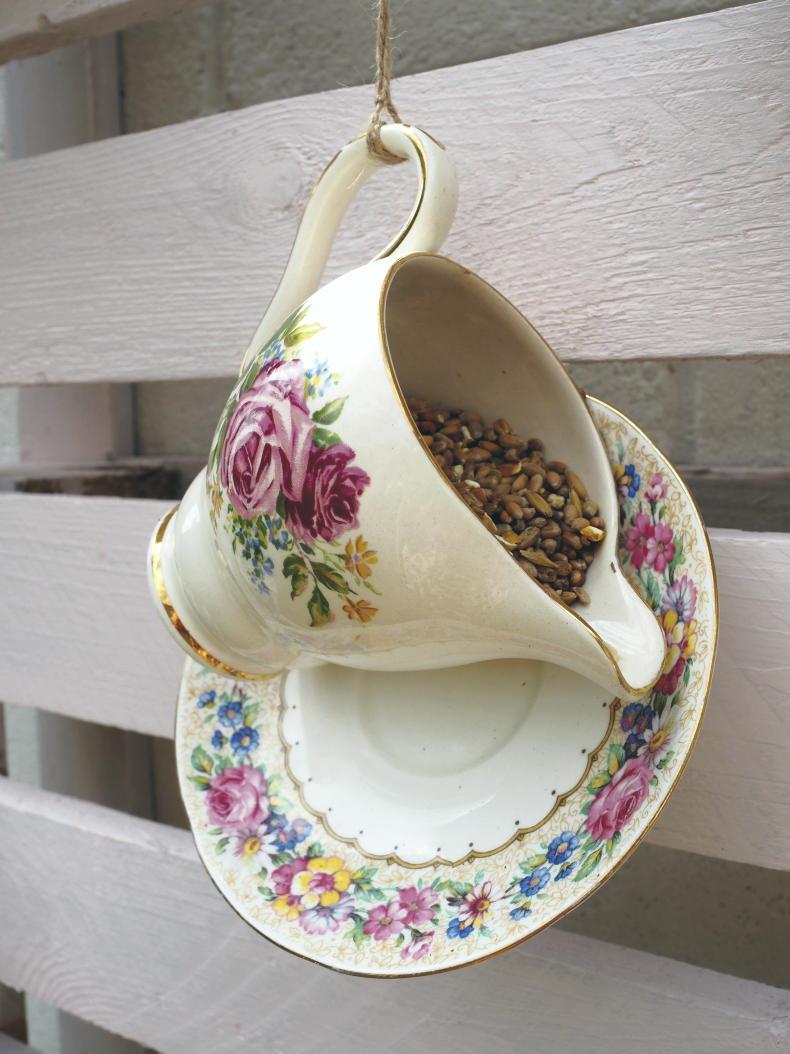
If you have spare bits of mismatched china, why not use them to serve some seeds to the birds in your garden? \ Catherine Carton
If you have spare bits of mismatched china, why not use them to serve some seeds to the birds in your garden? I love to leave food out for my local birdies and watch them play from my kitchen window.
It helps to sustain the wild birds through the winter months, and in return, they’ll help you out. I’ve noticed the smaller birds eating insects and aphids off my roses and plants – since they keep the bugs under control, I don’t have to use any pesticides.
When you start feeding birds in your garden, you will notice the many species that live amongst us. I have a robin who visits, and he prefers to eat the seed that falls on the ground.
Other smaller birds like the blue tit and chaffinch happily swing and eat from bird feeders. Having a mix of tables and feeders will cater to most birds native to your area.
What you need:
A china cup and a plate Strong glue adhesive Tape Strong twine or chain Metal hooksMethod
1 When choosing china, the lighter the better. Check for cracks or chips, as these could injure a bird’s leg or claw. Wash your teacups well to remove grime.
2 The glue is the essential part of this project. Choose adhesive that requires time to set. You want it to be strong enough to hold the weight of the plate, seed and bird. I like to use E6000 or Gorilla Glue.
3 Position the cup in the centre of the saucer, on its side. Apply a bead of glue to the saucer and firmly place the cup on top. Use some tape to hold the cup and saucer together while the glue cures.
4 You can sit the teacup feeder on a shelf, or you can hang it. To hang, add either a sturdy piece of twine or a thin metal chain to the handle of your cup. The string shouldn’t be too long – around five or six inches, depending on what you’re hanging it from – as we don’t want the teacup to over-swing or blow around too much in the wind. Add a hook to a wall or a wooden palette like mine and hang your bird feeder from it. You can also hang it from the branch of a tree.
5 It is best to keep your teacup feeders in a sheltered area, away from harsh winds and weather. Check your feeders regularly for any sign of deterioration and clean them with warm water to help stop the spread of disease and bacteria.
6 It may take a week or more for the birds to discover your new feeders, but when they do, I promise that you will have some regular visitors to your garden.
7 To make a sturdier teacup feeder, instead of using glue, you can drill a hole of the same size in both the cup and plate, then use a screw and nut to secure the cup to the plate.
Millions of car tyres become unusable each year – they’re difficult to recycle as they contain metals and chemicals that are harmful to the environment when burnt. You can pick them up for a few Euro (or free) on second-hand websites.
Some gardeners use tyres to make raised beds in their borders, which is a great idea. Another lovely way to repurpose one is to create a planter for your garden.
It is believed the chemicals from tyres only release when they are burnt or slowly over time; still, I prefer to use my tyre for annuals and perennials rather than edible plants like herbs and vegetables.
For the past few years, I have a wildflower mix thriving in my tyre planter. It makes a pretty floral display and provides food for the bees and other insects.
What you need
Two tyres Power washer (optional) Wire brush and soapy water Piece of wood Jigsaw or hand saw Drill Screws suitable for outdoor use Legs or castors (optional) Recycled plastic Method
1 Choose two tyres of the same size. Before turning them into planters, give the tyres a deep clean. A blast of a power washer is ideal, but you can also use a wire brush and warm, soapy water to remove any built-up grime and grease.
2 To create a base, trace the round shape of the tyre onto a piece of wood. Carefully cut the wood using a jigsaw or hand saw.
3 Drill the wooden base into the rubber tyre using a drill and screws. Drill a hole in the base to create drainage in your planter.
4 You can add legs or castor wheels to your planter to raise it off the ground. You can stack two tyres or you can use only one. If stacking the tyres, secure them to each other by screwing the inner walls of each tyre together.
5 Use recycled plastic to line the planter and protect the wood from rotting. I used old plastic bags – just make sure to check them for holes beforehand.
6 Fill with a mix of peat-free compost, organic matter and add some vermiculite or grit for drainage.
Have fun with your floral display. Why not plant some tulips and daffodils for spring colour, or some dahlias for a late summer or early autumn bloom?
If you have spare bits of mismatched china, why not use them to serve some seeds to the birds in your garden? \ Catherine Carton
If you have spare bits of mismatched china, why not use them to serve some seeds to the birds in your garden? I love to leave food out for my local birdies and watch them play from my kitchen window.
It helps to sustain the wild birds through the winter months, and in return, they’ll help you out. I’ve noticed the smaller birds eating insects and aphids off my roses and plants – since they keep the bugs under control, I don’t have to use any pesticides.
When you start feeding birds in your garden, you will notice the many species that live amongst us. I have a robin who visits, and he prefers to eat the seed that falls on the ground.
Other smaller birds like the blue tit and chaffinch happily swing and eat from bird feeders. Having a mix of tables and feeders will cater to most birds native to your area.
What you need:
A china cup and a plate Strong glue adhesive Tape Strong twine or chain Metal hooksMethod
1 When choosing china, the lighter the better. Check for cracks or chips, as these could injure a bird’s leg or claw. Wash your teacups well to remove grime.
2 The glue is the essential part of this project. Choose adhesive that requires time to set. You want it to be strong enough to hold the weight of the plate, seed and bird. I like to use E6000 or Gorilla Glue.
3 Position the cup in the centre of the saucer, on its side. Apply a bead of glue to the saucer and firmly place the cup on top. Use some tape to hold the cup and saucer together while the glue cures.
4 You can sit the teacup feeder on a shelf, or you can hang it. To hang, add either a sturdy piece of twine or a thin metal chain to the handle of your cup. The string shouldn’t be too long – around five or six inches, depending on what you’re hanging it from – as we don’t want the teacup to over-swing or blow around too much in the wind. Add a hook to a wall or a wooden palette like mine and hang your bird feeder from it. You can also hang it from the branch of a tree.
5 It is best to keep your teacup feeders in a sheltered area, away from harsh winds and weather. Check your feeders regularly for any sign of deterioration and clean them with warm water to help stop the spread of disease and bacteria.
6 It may take a week or more for the birds to discover your new feeders, but when they do, I promise that you will have some regular visitors to your garden.
7 To make a sturdier teacup feeder, instead of using glue, you can drill a hole of the same size in both the cup and plate, then use a screw and nut to secure the cup to the plate.


SHARING OPTIONS