A livestock trailer is an essential piece of machinery used within any livestock farming enterprise, big or small, and a piece of machinery that tends to be used all-year round.
Livestock trailers tend to be among the most neglected pieces of kit around any farmyard, only receiving attention on a needs-be basis. But in order to ensure reliability and safe movement of livestock on public roads and to stay on the right side of the law, routine maintenance is important.
We caught up with Ifor Williams’ agent, Whites Trailers in Co Longford, to look at a typical service procedure and what’s involved. The trailer in question was a 12ft x 6ft Ifor Williams, which would be considered a fairly typical example of that found on Irish farms. However, it’s worth noting that the points discussed are applicable to other brands and trailer types, ie flatbed/plant trailers, as they tend to share the same running gear. All main dealers will carry replacement parts and the corresponding service kits for your trailer. Finally, if mechanics isn’t your strong point, then let this article serve as a timely reminder to have your trailer serviced by a professional.
Hitch
Starting at the front of the trailer, check the hitch for wear. Some will have a wear indicator on the side. Once locked on the ball, you shouldn’t be able to lift the hitch head past the indicator. Alternatively, place a tow ball into the head and check for wear. Ideally, this should be a snug fit, with the ball only able to turn smoothly within the hitch. If there is excessive movement to the point that the ball feels loose, then replace the hitch head. But first, check if it’s either the 2.7t or 3.5t rated type. The common 3.5t hitch head will cost about €110, including VAT.

Check for hitch head wear using a ball or using the wear indicator.
Barry recommends replacing the bolt(s) which attaches the hitch head to the trailer chassis for peace of mind, given the load it’s under when towing. Either way, the bolt(s) should be checked and tightened to the manufacturer’s specification.
Depending on the brand, the hitch may have one or two grease nipples. These should receive a pump of grease regularly. Grease allows the hitch barrel to move freely while the brakes are being applied. Lack of grease will have the opposite effect and cause wear. Remove or pull back the rubber bellow and inspect barrel condition. If worn or twisted it is advisable to fit a completely new hitch. A replacement (including head) will cost in the region of €300 to €380, including VAT.
Also check that all the hitch bolts are adequately tightened. The rubber bellow protects the barrel and retains grease. A cut or missing bellow will result in water and dirt ingress. A replacement will only cost €15-€20, including VAT.
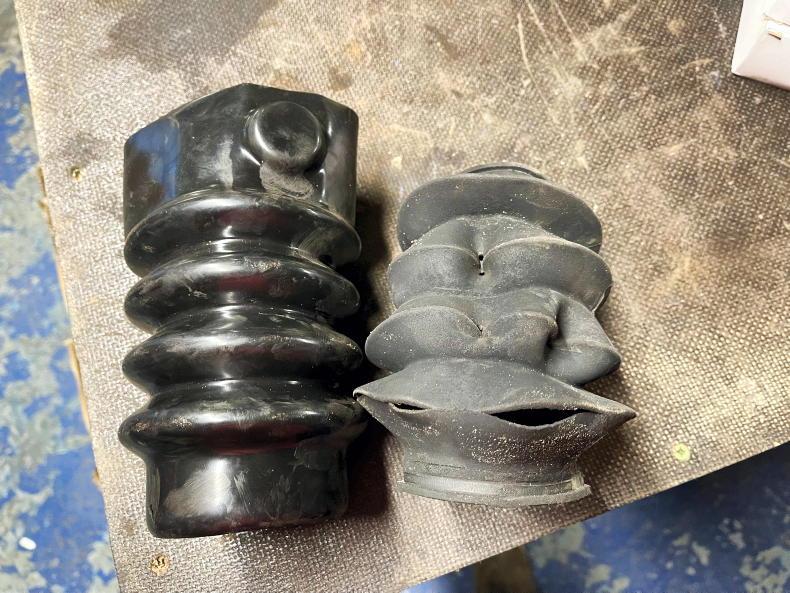
The rubber bellow should be replaced if damaged, in order to prevent dirt and moisture ingress into the draw tube.
Damper
The damper is a device that compresses as the vehicle slows and proportionally applies the trailer’s brakes. Ideally, the damper should be replaced at every service.
However, if the hitch barrel can be pushed back by hand or the trailer ‘jolts’ forward while braking, then it will definitely need replacing. The damper is seated within the hitch barrel and will require a little stripping to access.
“A damper that is easily compressed is often an indication that there is an underlying brake issue, ie seized cables or worn shoes. When replacing it, check out the condition of brake shoes and cables, otherwise it will fail again prematurely,” Barry outlined.
Similarly, a worn damper will cause the brakes to fail and leave the jeep or car to do all the braking. This not only causes further wear on the car or jeep’s brakes, but will increase stopping distance or, worst case, cause the trailer to jackknife if brakes are applied suddenly. A new damper will cost around €70-€85, including VAT.
If the damper is easily compressed then it needs to be replaced.
Breakaway cable
Barry highlighted the breakaway cable as one of the most important components, yet one of the more common components not fitted when trailers arrive in for a service.
That said, the breakaway cable is an important safety feature which only works in the unfortunate event that a trailer becomes uncoupled from its vehicle on the move. The breakaway cable will pull, instantly engaging the handbrake and bring the trailer to a halt before snapping.
.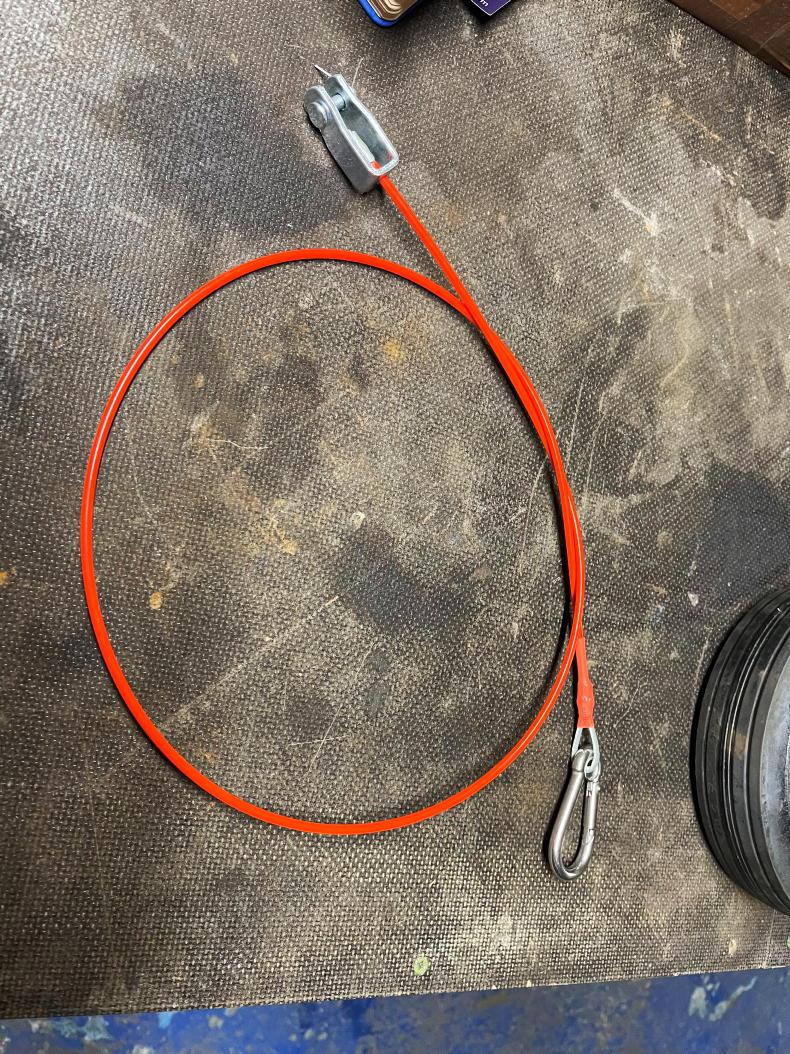
A proper breakaway cable should be fitted on all hitches.
It is not recommended to use a chain as it may not snap, meaning the vehicle and trailer will remain connected and could potentially cause the vehicle to crash if the trailer becomes uncoupled. A breakaway cable will only cost between €10 to €15, including VAT.
The brake fork should be checked. It’s important that it can move freely and is not seized. The breakaway cable is connected to the break fork, so it’s required in the event of an emergency. Regular lubrication should be applied.
Jockey wheel
Every trailer should be fitted with a free-moving jockey wheel in order to avoid having to lift the trailer onto the tow ball. Ensure it is lowered as much as possible and fastened before winding starts. Depending on the respective load ratings (2.7t or 3.5t), jockey wheels range from €45 to €80, including VAT. If the actual wheel itself is damaged it can itself be replaced, wheels cost in the region of €20-€25, including VAT.
Bearings and brake cables
Brakes and wheel bearings are among the harder but important parts of the service procedure. Firstly, check the wheel bearings for play. Do this by moving each wheel once jacked up. Spin each wheel listening for roughness, then look/feel for movement. Hub bearings cost between €10 and €40 each, including VAT, depending on type. A press tends to be required for replacement.
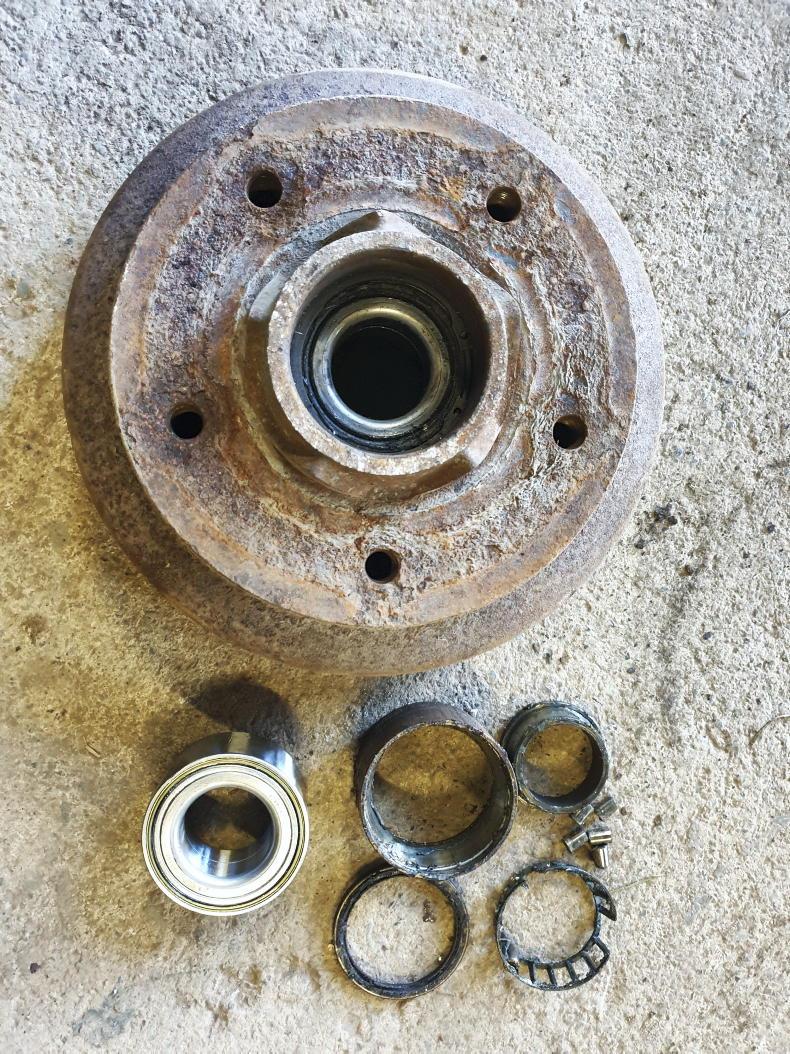
The condition of the wheel bearing can be inspected by spinning the wheel once off the ground, checking for play and or roughness.
Modern Ifor Williams examples use a sealed bearing, while other manufacturers use tapered bearings. Since the latter are not sealed, they need to be greased regularly.
If gone unnoticed for too long, a failed bearing can lead to hub damage and result in the hub needing to be replaced, costing €135-€175, including VAT, depending on size (eight-stud or 10- stud). To gain access to wheel bearings or brakes, start by removing the wheels and large hub nut. Next, remove the hub itself. This exposes the brakes and axle stub. The wheel bearing which remains inside the hub. Now that the brake plates are exposed, start by checking the condition of each brake cable right back to the handbrake rod.
Barry recommends replacing all brake cables and brake shoes together as one, again for peace of mind. Overtime, cables will seize and wear. He also advises to cable-tie each brake cable to the axle to prevent rubbing. Brake cables cost about €15 to €20, including VAT, each.
Brake adjustment and brake shoes
Worn brake shoes need replaced, making sure to insert each spring the correct way around or the shoe will want to pull away from the hub. Replacement brake shoe kits cost between €45 and €80, including VAT, per axle, depending on size. If brakes have been recently replaced, they may just need adjusting.
During replacement, ensure the expander on each is in its slackened position and that the adjuster is freely moving. During reassembly, it’s recommended that the shoe contact area inside the hub is cleaned using a wire brush. A new hub nut should be fitted and correctly torqued.
.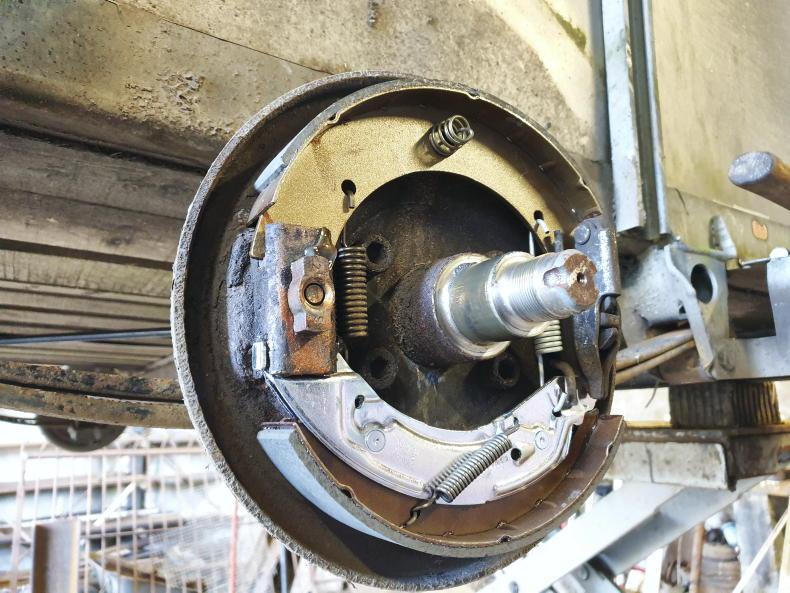
Replacement brake shoes will come with new springs, which should be fitted.
Once reassembled and the wheel fitted, now tighten/loosen the adjuster nut (17mm or 19mm socket) while spinning the hub/wheel until it just locks up. Then loosen it half a turn, now it should be set.
Barry recommends checking brake adjustment a short while after new shoes and cables have bedded in. He also advises not to leave a trailer’s handbrake applied for long periods of time, where possible. Otherwise the shoes can seize to the hub and cause the brakes to stick-on once moved.
This can lead to the brake shoe material being stripped from the steel part of the shoe and in need of replacement.
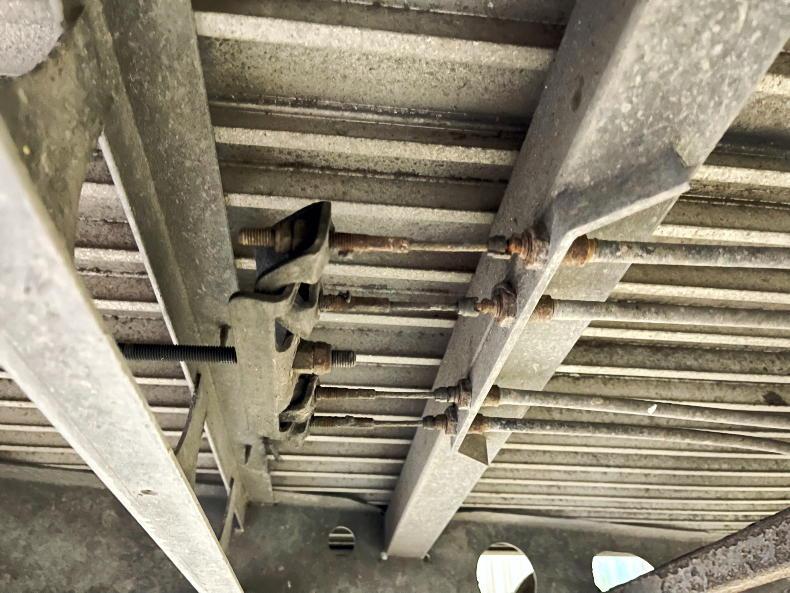
Suspension
All modern trailers are fitted with leaf springs. Some five-leaf, some twin-leaf and some with single-leaf types. Check for broken springs and that the axle hasn’t moved – this would indicate a loose U-bolt. At either end of the spring there is a bushing where it mounts to the trailer. Check for movement in the bushing – worn bushing will leave a trailer noisy. Each set of U-bolts holds a bump stop in place. Replacement bump stops cost around €6, including VAT. Bushings cost around €5 to 10, including VAT, each. Springs will cost anywhere from €60-€100, including VAT each. 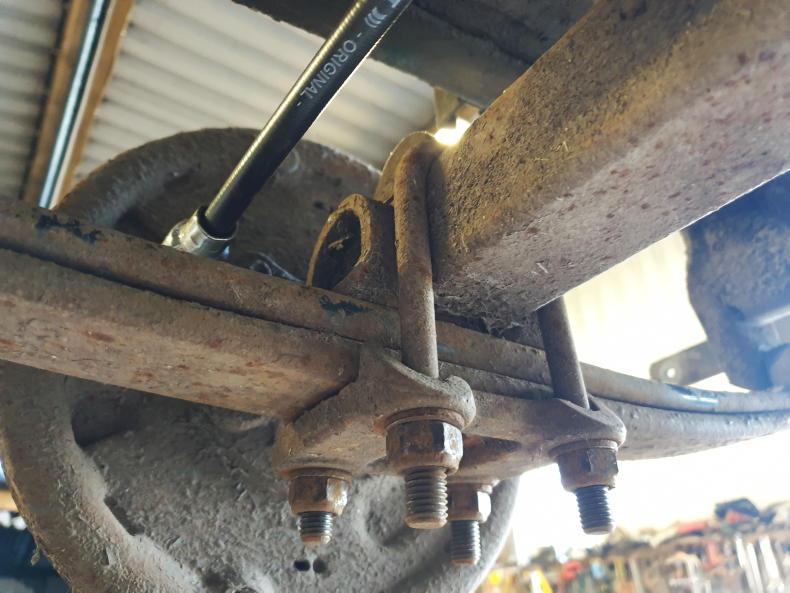
All U-bolts should be tight and have a bump stop in place.
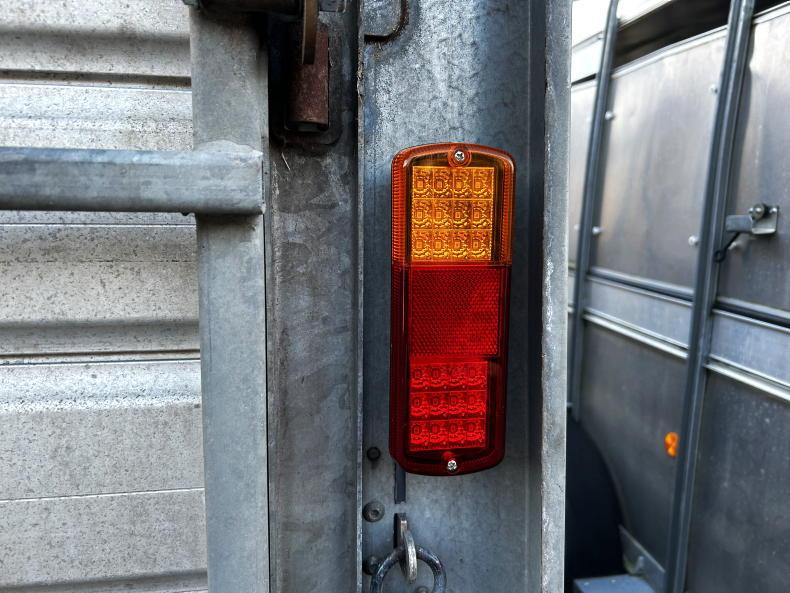
Lights and tyres
All lights should be functional. Beyond a blown bulb, there can be issues with the seven/thirteen-pin plug or junction box(es). Depending on the brand, the number of junction boxes can vary. Barry pointed out that corrosion is the most common issue with lights, leading to a bad earth or complete failure. Replacement boards can be bought for corroded junction boxes.
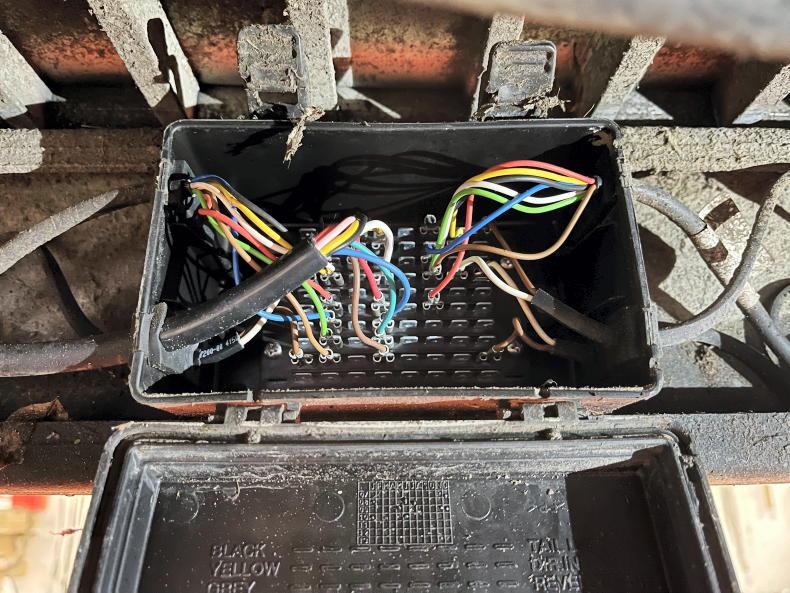
Generally, lighting issues tend to come as result of corrosion.
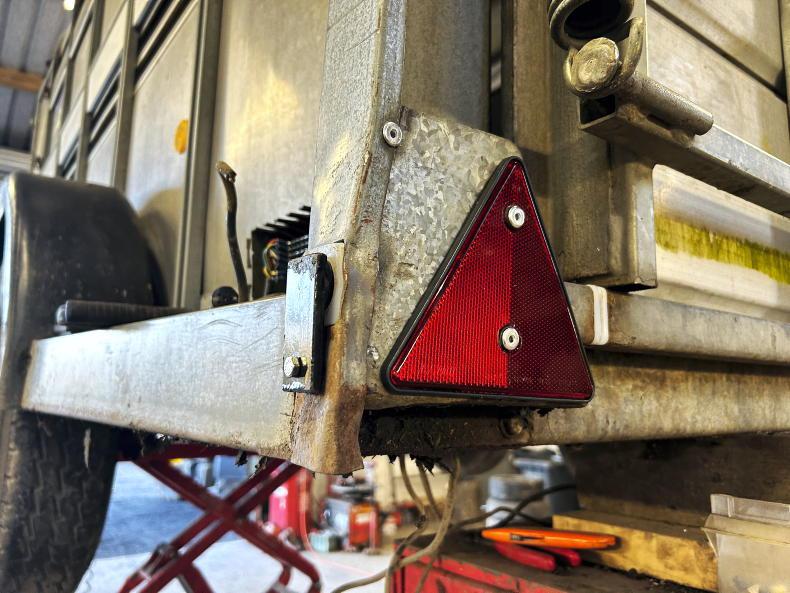
Tyre walls often tend to give way before thread proves an issue. All tyres should be road legal and inflated to the correct pressure. The smaller the rim, the higher the tyre pressure generally. Barry recommends 65psi to be the go-to pressure for a typical livestock trailer fitted with 16in rims. While on the topic of road legality, ensure all trailers are fitted with reflectors and a number plate that corresponds to the vehicle towing it.
If lights are flickering or working intermittingly, it is usually due to a bad earth.
Ramps and hinges
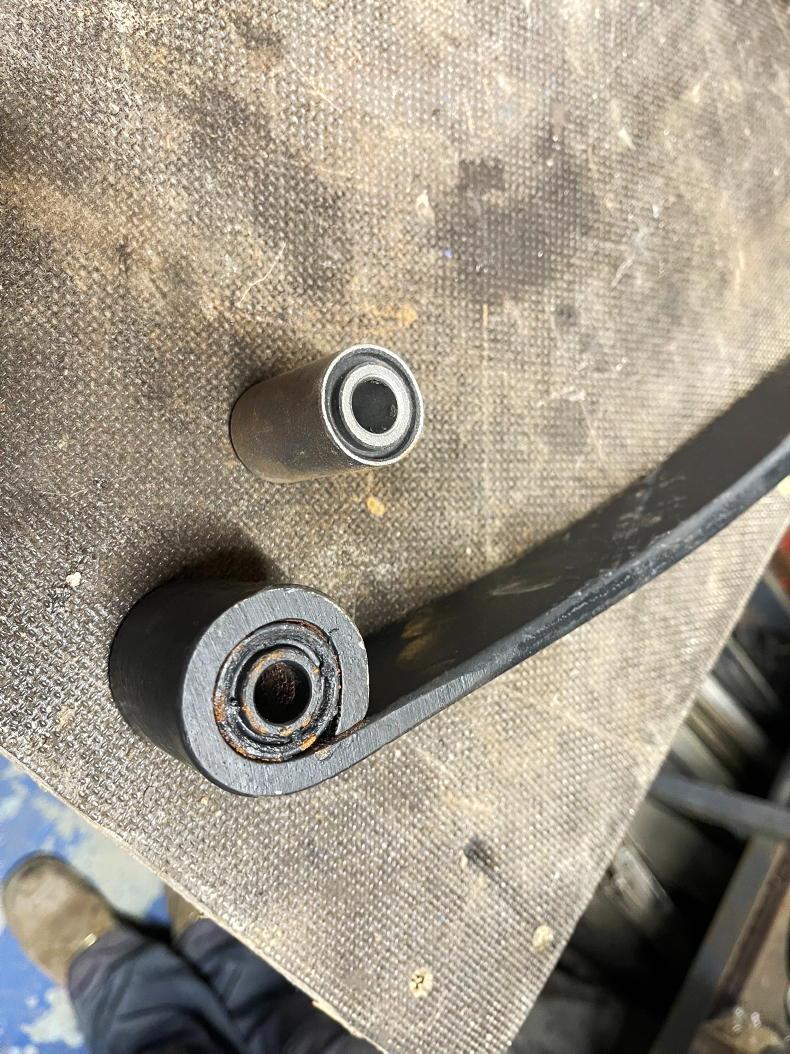
On livestock trailers especially, check the condition of the bushings in the ramp hinges. A ramp that is hard to close may need new bushings. Bushings will cost no more than €10, including VAT, each. Over time springs can fatigue and will need replacing. Check the condition of the gate, particularly around the hinges, and repair if necessary.

Rear ramp hinge bushings should be checked for wear and replaced.
Five top tips
Regularly check tyre condition and that brakes and lights are functional.Avoid parking with the handbrake on for prolonged periods.Ensure there is a breakaway cable fitted.Schedule a full service once annually or more, depending on usage.Record your trailer serial number and have it insured.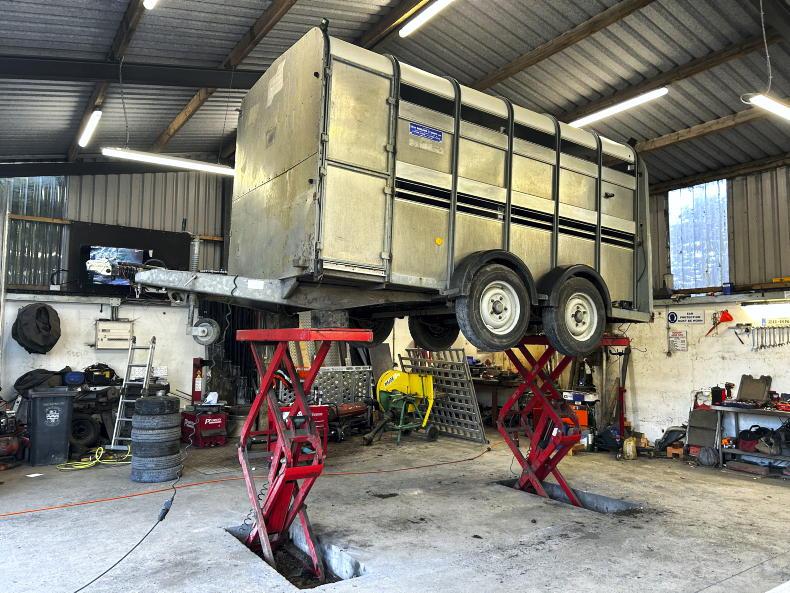
Proper trailer maintenance is essential for the safe transport of livestock on public roads.

A new new hitch will cost in the region of €300, plus VAT.
Worn spring bushings will leave a trailer noisey on the road.

It is advised to replace all brake cables and brake shoes together at once.

If the handbrake is left on for prolonged time periods, the brake shoe can become stripped off the metal carrier once released.
The handbrake rod attaches to the central plate holding the brake cables.
Rear ramp hinge bushings should be checked for wear and tear; reflectors replaced if broken.
A livestock trailer is an essential piece of machinery used within any livestock farming enterprise, big or small, and a piece of machinery that tends to be used all-year round.
Livestock trailers tend to be among the most neglected pieces of kit around any farmyard, only receiving attention on a needs-be basis. But in order to ensure reliability and safe movement of livestock on public roads and to stay on the right side of the law, routine maintenance is important.
We caught up with Ifor Williams’ agent, Whites Trailers in Co Longford, to look at a typical service procedure and what’s involved. The trailer in question was a 12ft x 6ft Ifor Williams, which would be considered a fairly typical example of that found on Irish farms. However, it’s worth noting that the points discussed are applicable to other brands and trailer types, ie flatbed/plant trailers, as they tend to share the same running gear. All main dealers will carry replacement parts and the corresponding service kits for your trailer. Finally, if mechanics isn’t your strong point, then let this article serve as a timely reminder to have your trailer serviced by a professional.
Hitch
Starting at the front of the trailer, check the hitch for wear. Some will have a wear indicator on the side. Once locked on the ball, you shouldn’t be able to lift the hitch head past the indicator. Alternatively, place a tow ball into the head and check for wear. Ideally, this should be a snug fit, with the ball only able to turn smoothly within the hitch. If there is excessive movement to the point that the ball feels loose, then replace the hitch head. But first, check if it’s either the 2.7t or 3.5t rated type. The common 3.5t hitch head will cost about €110, including VAT.
Check for hitch head wear using a ball or using the wear indicator.
Barry recommends replacing the bolt(s) which attaches the hitch head to the trailer chassis for peace of mind, given the load it’s under when towing. Either way, the bolt(s) should be checked and tightened to the manufacturer’s specification.
Depending on the brand, the hitch may have one or two grease nipples. These should receive a pump of grease regularly. Grease allows the hitch barrel to move freely while the brakes are being applied. Lack of grease will have the opposite effect and cause wear. Remove or pull back the rubber bellow and inspect barrel condition. If worn or twisted it is advisable to fit a completely new hitch. A replacement (including head) will cost in the region of €300 to €380, including VAT.
Also check that all the hitch bolts are adequately tightened. The rubber bellow protects the barrel and retains grease. A cut or missing bellow will result in water and dirt ingress. A replacement will only cost €15-€20, including VAT.
The rubber bellow should be replaced if damaged, in order to prevent dirt and moisture ingress into the draw tube.
Damper
The damper is a device that compresses as the vehicle slows and proportionally applies the trailer’s brakes. Ideally, the damper should be replaced at every service.
However, if the hitch barrel can be pushed back by hand or the trailer ‘jolts’ forward while braking, then it will definitely need replacing. The damper is seated within the hitch barrel and will require a little stripping to access.
“A damper that is easily compressed is often an indication that there is an underlying brake issue, ie seized cables or worn shoes. When replacing it, check out the condition of brake shoes and cables, otherwise it will fail again prematurely,” Barry outlined.
Similarly, a worn damper will cause the brakes to fail and leave the jeep or car to do all the braking. This not only causes further wear on the car or jeep’s brakes, but will increase stopping distance or, worst case, cause the trailer to jackknife if brakes are applied suddenly. A new damper will cost around €70-€85, including VAT.
If the damper is easily compressed then it needs to be replaced.
Breakaway cable
Barry highlighted the breakaway cable as one of the most important components, yet one of the more common components not fitted when trailers arrive in for a service.
That said, the breakaway cable is an important safety feature which only works in the unfortunate event that a trailer becomes uncoupled from its vehicle on the move. The breakaway cable will pull, instantly engaging the handbrake and bring the trailer to a halt before snapping.
.
A proper breakaway cable should be fitted on all hitches.
It is not recommended to use a chain as it may not snap, meaning the vehicle and trailer will remain connected and could potentially cause the vehicle to crash if the trailer becomes uncoupled. A breakaway cable will only cost between €10 to €15, including VAT.
The brake fork should be checked. It’s important that it can move freely and is not seized. The breakaway cable is connected to the break fork, so it’s required in the event of an emergency. Regular lubrication should be applied.
Jockey wheel
Every trailer should be fitted with a free-moving jockey wheel in order to avoid having to lift the trailer onto the tow ball. Ensure it is lowered as much as possible and fastened before winding starts. Depending on the respective load ratings (2.7t or 3.5t), jockey wheels range from €45 to €80, including VAT. If the actual wheel itself is damaged it can itself be replaced, wheels cost in the region of €20-€25, including VAT.
Bearings and brake cables
Brakes and wheel bearings are among the harder but important parts of the service procedure. Firstly, check the wheel bearings for play. Do this by moving each wheel once jacked up. Spin each wheel listening for roughness, then look/feel for movement. Hub bearings cost between €10 and €40 each, including VAT, depending on type. A press tends to be required for replacement.
The condition of the wheel bearing can be inspected by spinning the wheel once off the ground, checking for play and or roughness.
Modern Ifor Williams examples use a sealed bearing, while other manufacturers use tapered bearings. Since the latter are not sealed, they need to be greased regularly.
If gone unnoticed for too long, a failed bearing can lead to hub damage and result in the hub needing to be replaced, costing €135-€175, including VAT, depending on size (eight-stud or 10- stud). To gain access to wheel bearings or brakes, start by removing the wheels and large hub nut. Next, remove the hub itself. This exposes the brakes and axle stub. The wheel bearing which remains inside the hub. Now that the brake plates are exposed, start by checking the condition of each brake cable right back to the handbrake rod.
Barry recommends replacing all brake cables and brake shoes together as one, again for peace of mind. Overtime, cables will seize and wear. He also advises to cable-tie each brake cable to the axle to prevent rubbing. Brake cables cost about €15 to €20, including VAT, each.
Brake adjustment and brake shoes
Worn brake shoes need replaced, making sure to insert each spring the correct way around or the shoe will want to pull away from the hub. Replacement brake shoe kits cost between €45 and €80, including VAT, per axle, depending on size. If brakes have been recently replaced, they may just need adjusting.
During replacement, ensure the expander on each is in its slackened position and that the adjuster is freely moving. During reassembly, it’s recommended that the shoe contact area inside the hub is cleaned using a wire brush. A new hub nut should be fitted and correctly torqued.
.
Replacement brake shoes will come with new springs, which should be fitted.
Once reassembled and the wheel fitted, now tighten/loosen the adjuster nut (17mm or 19mm socket) while spinning the hub/wheel until it just locks up. Then loosen it half a turn, now it should be set.
Barry recommends checking brake adjustment a short while after new shoes and cables have bedded in. He also advises not to leave a trailer’s handbrake applied for long periods of time, where possible. Otherwise the shoes can seize to the hub and cause the brakes to stick-on once moved.
This can lead to the brake shoe material being stripped from the steel part of the shoe and in need of replacement.
Suspension
All modern trailers are fitted with leaf springs. Some five-leaf, some twin-leaf and some with single-leaf types. Check for broken springs and that the axle hasn’t moved – this would indicate a loose U-bolt. At either end of the spring there is a bushing where it mounts to the trailer. Check for movement in the bushing – worn bushing will leave a trailer noisy. Each set of U-bolts holds a bump stop in place. Replacement bump stops cost around €6, including VAT. Bushings cost around €5 to 10, including VAT, each. Springs will cost anywhere from €60-€100, including VAT each.
All U-bolts should be tight and have a bump stop in place.
Lights and tyres
All lights should be functional. Beyond a blown bulb, there can be issues with the seven/thirteen-pin plug or junction box(es). Depending on the brand, the number of junction boxes can vary. Barry pointed out that corrosion is the most common issue with lights, leading to a bad earth or complete failure. Replacement boards can be bought for corroded junction boxes.
Generally, lighting issues tend to come as result of corrosion.
Tyre walls often tend to give way before thread proves an issue. All tyres should be road legal and inflated to the correct pressure. The smaller the rim, the higher the tyre pressure generally. Barry recommends 65psi to be the go-to pressure for a typical livestock trailer fitted with 16in rims. While on the topic of road legality, ensure all trailers are fitted with reflectors and a number plate that corresponds to the vehicle towing it.
If lights are flickering or working intermittingly, it is usually due to a bad earth.
Ramps and hinges
On livestock trailers especially, check the condition of the bushings in the ramp hinges. A ramp that is hard to close may need new bushings. Bushings will cost no more than €10, including VAT, each. Over time springs can fatigue and will need replacing. Check the condition of the gate, particularly around the hinges, and repair if necessary.
Rear ramp hinge bushings should be checked for wear and replaced.
Five top tips
Regularly check tyre condition and that brakes and lights are functional.Avoid parking with the handbrake on for prolonged periods.Ensure there is a breakaway cable fitted.Schedule a full service once annually or more, depending on usage.Record your trailer serial number and have it insured.
Proper trailer maintenance is essential for the safe transport of livestock on public roads.
A new new hitch will cost in the region of €300, plus VAT.
Worn spring bushings will leave a trailer noisey on the road.
It is advised to replace all brake cables and brake shoes together at once.
If the handbrake is left on for prolonged time periods, the brake shoe can become stripped off the metal carrier once released.
The handbrake rod attaches to the central plate holding the brake cables.
Rear ramp hinge bushings should be checked for wear and tear; reflectors replaced if broken.


SHARING OPTIONS