While slurry tankers differ in size, shape and brand, as well as specification, one thing that is common across all on the Irish market is the trusty old vacuum pump, or a rotary vane pump in technical terms.
These typically Italian-built pumps are the beating heart of the tanker and are rather simple in design. The purpose of the vacuum pump is to either remove air from the tankers or to push air into it. When air is removed from the tanker, a vacuum is created, causing the slurry to be sucked into the tanker.
When the pump is run in reverse, the opposite occurs, causing air to be pushed into the tanker which in turn builds pressure to spread the slurry or feed the applicator’s macerator once the gate valve is opened.
However, whether it’s down to wear and tear or poor maintenance, every pump will eventually need to be overhauled at some point.
A rotary vane pump consists of wafer-like vanes which are slotted into a gear-driven offset rotor, that rotates inside a twin-ported chamber. During rotation a centrifugal force is created which throws the vanes to the side of the chamber wall, creating a seal. This causes air to be swept from one port to the other, depending on rotation. This determines whether the tanker is set to ‘suck’ or ‘blow’.
Lubrication is critical to ensure longevity of a pump. The rotor drives a small pump which delivers oil through an adjustable drip feed. The pump should be lubricated at a rate of one drop every one to two seconds.
Over time, vanes will wear due to friction, but this will happen much quicker when a pump is poorly maintained.

Overtime, all vanes will wear due to friction during use, the time taken will depend on pump maintenance.
It’s not uncommon for a vane to break or become stuck within a rotor slot, which too will drastically reduce the pump’s ability to work efficiently, or even stop it working altogether. Full rebuild kits including vanes and gaskets will cost in the region of €200 plus VAT, depending on pump make and model.

Complete rebuild kits can be bought from dealers costing in the region of €200 plus VAT depending on brand and pump model.
Diagnosing a poor-performing pump
Best practice is to try to rotate the pump by hand before attaching the PTO shaft – this will help identify a potential problem such as a stuck vane before applying the tractor’s power to it which may potentially cause more damage. If the pump doesn’t rotate freely, you should free it by hand using the PTO shaft at 90 degrees for leverage. If it doesn’t move then it’s likely the pump will need to be split to diagnose and fix the problem.
Another sign that there is an internal issue with the pump is that the sound may be different from the normal note, the suction performance may be reduced or worst-case scenario it will not work at all.
Below we look at the steps involved in replacing the vanes inside a typical Battioni pump. While Battioni and Jurop are two of the common brands found on Irish built tankers, the operational principle and service procedure between different brand pumps and models remains quite similar.
1. Preparation
It is best practice to access the pump’s rotor from the back side, this will more than likely mean removing the pump from the drawbar. In most cases the pump will be mounted via four or six bolts, however this may differ where there is a Garda pump fitted alongside the vacuum pump. Remove these bolts and lift the vacuum pump off the drawbar. At this point, if not already done, give the pump a good wash before starting the tear-down procedure.
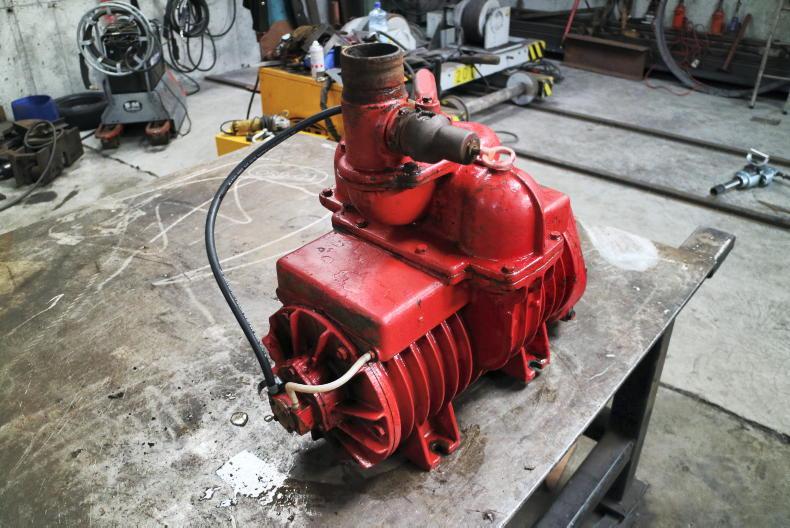
Remove the pump and power wash it before beginning the tear down process.
2. Check the oil pump
The oiler is a critical component which, in some cases, may be the root cause of vane failure due to lack of lubrication. Clean the oil system, ensuring it is free from debris and that it is working correctly.

Worn or damaged oil pumps can be replaced relatively cheap.
To do this, remove the bolts holding the oil pump to the vacuum pump and remove it, taking care not to lose the small drive piece. It may be an option to fit a new oil pump kit, which is relatively inexpensive. The kit should include a new oil pump, oiler, pipes and the necessary gaskets to refit. During the rebuild, ensure that the drive is in place and correctly aligned to avoid bending or breakage. This is a common mistake, which leads to the oil pump not working.
3. Remove the faceplate
The next step is to access the chamber where the rotor and vanes are located. Remove the ring of bolts around the faceplate (rear of the pump). Now refit two longer bolts with matching threads into the dedicated the holes and tighten evenly and gently to pop the faceplate off the rotor shaft. Some pumps may have a circlip here that needs to be removed. The gasket seal may become damaged during the process, but not to worry, as it will be replaced during the rebuild. By now all the vanes will be accessible for replacement, however, best practice is to remove the entire rotor.
4. Gearbox removal
To remove the rotor, the gearbox on the input shaft side will need to be removed. Drain the oil within the gearbox and remove the studs.

Drain the oil from the gearbox and remove the gear casing in a similar fashion to the face plate on the other side.
Similar to the faceplate, thread two longer bolts into the dedicated holes to pop off the gear casing. Once removed, assess the condition of the gears and bearing. Ideally, the gears should show no signs of damage or wear, otherwise they will need to be replaced. Any roughness in the bearing will leave it in need of replacement.
5. Gearbox housing removal
To gain access to the rotor, there are two bolts within the gearbox housing that need removal. The housing should now come off. There will be an oil seal present that runs on the shaft – our advice is to replace it for peace of mind given that a seal will only cost around €5 plus VAT.
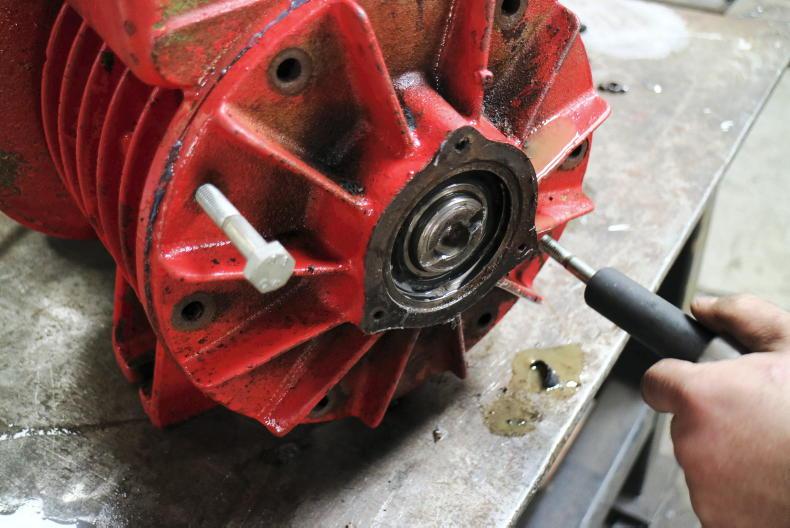
Once all the studs have been removed, thread in two longer bolts to gently pry off the face plate.
6. Remove the rotor
The rotor should now pull out of the chamber, but take care as it’s heavier than it looks. Once removed, it’s an ideal opportunity to give it a thorough wash including the vane slots. When washing, clean the chamber thoroughly as well.

The vanes and rotor exposed.
Now check for any blemishes or signs of roughness inside the chamber. Use a fine grit piece of sandpaper to remove any roughness and to clean up the slots to ensure vanes can slide in and out freely once replaced. Avoid leaving the chamber and rotor separated for long periods as rust will quickly start to form leaving the chamber rough and in need of further cleaning with sandpaper or a flap wheel.
7. Vane replacement
Once the slots are cleaned and sanded the next step is to fit the new vanes. Before doing so, rub the vanes lightly with pump oil and make sure they can slide freely once seated. Vanes that stick or are tight will only cause the pump to run incorrectly or cause damage, so it’s vital that this step is done correctly.
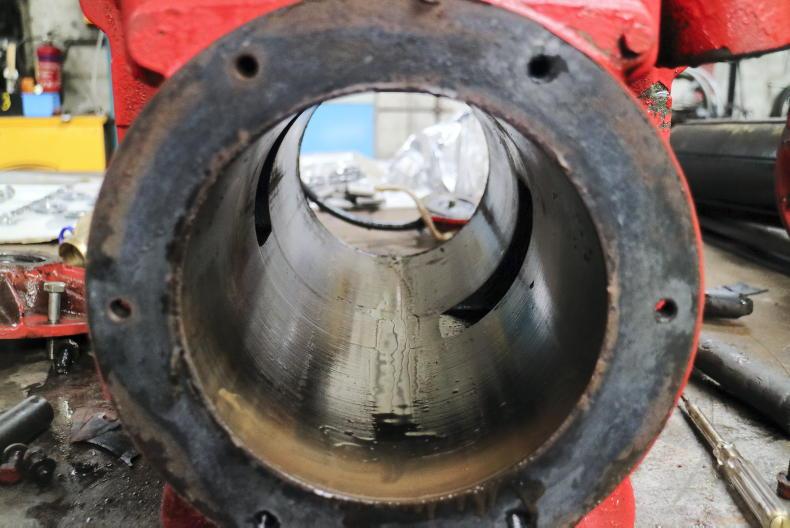
Clean the pump chamber and remove any roughness with fine sand paper.
Once vanes are fitted, the rebuild process is simply a reverse of the strip down. Our advice is to make sure all surfaces are clean and dry and replace all seals and gaskets to prevent leaks afterwards. When refitting new gaskets, ensure the old gaskets are fully removed and the surface is clean to allow for a good seal. Once reassembled, refill the gearbox with fresh oil such as SAE 90, or whatever is recommended by the manufacturer. Then, refill the pump oiler with a clean light oil such as hydraulic oil, or as recommended by the manufacturer.
Once fully reassembled, turn the pump by hand for a number of rotations to ensure everything is correctly seated and working. Now remount the pump to the tanker’s drawbar and refit any components initially removed.
While slurry tankers differ in size, shape and brand, as well as specification, one thing that is common across all on the Irish market is the trusty old vacuum pump, or a rotary vane pump in technical terms.
These typically Italian-built pumps are the beating heart of the tanker and are rather simple in design. The purpose of the vacuum pump is to either remove air from the tankers or to push air into it. When air is removed from the tanker, a vacuum is created, causing the slurry to be sucked into the tanker.
When the pump is run in reverse, the opposite occurs, causing air to be pushed into the tanker which in turn builds pressure to spread the slurry or feed the applicator’s macerator once the gate valve is opened.
However, whether it’s down to wear and tear or poor maintenance, every pump will eventually need to be overhauled at some point.
A rotary vane pump consists of wafer-like vanes which are slotted into a gear-driven offset rotor, that rotates inside a twin-ported chamber. During rotation a centrifugal force is created which throws the vanes to the side of the chamber wall, creating a seal. This causes air to be swept from one port to the other, depending on rotation. This determines whether the tanker is set to ‘suck’ or ‘blow’.
Lubrication is critical to ensure longevity of a pump. The rotor drives a small pump which delivers oil through an adjustable drip feed. The pump should be lubricated at a rate of one drop every one to two seconds.
Over time, vanes will wear due to friction, but this will happen much quicker when a pump is poorly maintained.

Overtime, all vanes will wear due to friction during use, the time taken will depend on pump maintenance.
It’s not uncommon for a vane to break or become stuck within a rotor slot, which too will drastically reduce the pump’s ability to work efficiently, or even stop it working altogether. Full rebuild kits including vanes and gaskets will cost in the region of €200 plus VAT, depending on pump make and model.

Complete rebuild kits can be bought from dealers costing in the region of €200 plus VAT depending on brand and pump model.
Diagnosing a poor-performing pump
Best practice is to try to rotate the pump by hand before attaching the PTO shaft – this will help identify a potential problem such as a stuck vane before applying the tractor’s power to it which may potentially cause more damage. If the pump doesn’t rotate freely, you should free it by hand using the PTO shaft at 90 degrees for leverage. If it doesn’t move then it’s likely the pump will need to be split to diagnose and fix the problem.
Another sign that there is an internal issue with the pump is that the sound may be different from the normal note, the suction performance may be reduced or worst-case scenario it will not work at all.
Below we look at the steps involved in replacing the vanes inside a typical Battioni pump. While Battioni and Jurop are two of the common brands found on Irish built tankers, the operational principle and service procedure between different brand pumps and models remains quite similar.
1. Preparation
It is best practice to access the pump’s rotor from the back side, this will more than likely mean removing the pump from the drawbar. In most cases the pump will be mounted via four or six bolts, however this may differ where there is a Garda pump fitted alongside the vacuum pump. Remove these bolts and lift the vacuum pump off the drawbar. At this point, if not already done, give the pump a good wash before starting the tear-down procedure.

Remove the pump and power wash it before beginning the tear down process.
2. Check the oil pump
The oiler is a critical component which, in some cases, may be the root cause of vane failure due to lack of lubrication. Clean the oil system, ensuring it is free from debris and that it is working correctly.

Worn or damaged oil pumps can be replaced relatively cheap.
To do this, remove the bolts holding the oil pump to the vacuum pump and remove it, taking care not to lose the small drive piece. It may be an option to fit a new oil pump kit, which is relatively inexpensive. The kit should include a new oil pump, oiler, pipes and the necessary gaskets to refit. During the rebuild, ensure that the drive is in place and correctly aligned to avoid bending or breakage. This is a common mistake, which leads to the oil pump not working.
3. Remove the faceplate
The next step is to access the chamber where the rotor and vanes are located. Remove the ring of bolts around the faceplate (rear of the pump). Now refit two longer bolts with matching threads into the dedicated the holes and tighten evenly and gently to pop the faceplate off the rotor shaft. Some pumps may have a circlip here that needs to be removed. The gasket seal may become damaged during the process, but not to worry, as it will be replaced during the rebuild. By now all the vanes will be accessible for replacement, however, best practice is to remove the entire rotor.
4. Gearbox removal
To remove the rotor, the gearbox on the input shaft side will need to be removed. Drain the oil within the gearbox and remove the studs.

Drain the oil from the gearbox and remove the gear casing in a similar fashion to the face plate on the other side.
Similar to the faceplate, thread two longer bolts into the dedicated holes to pop off the gear casing. Once removed, assess the condition of the gears and bearing. Ideally, the gears should show no signs of damage or wear, otherwise they will need to be replaced. Any roughness in the bearing will leave it in need of replacement.
5. Gearbox housing removal
To gain access to the rotor, there are two bolts within the gearbox housing that need removal. The housing should now come off. There will be an oil seal present that runs on the shaft – our advice is to replace it for peace of mind given that a seal will only cost around €5 plus VAT.

Once all the studs have been removed, thread in two longer bolts to gently pry off the face plate.
6. Remove the rotor
The rotor should now pull out of the chamber, but take care as it’s heavier than it looks. Once removed, it’s an ideal opportunity to give it a thorough wash including the vane slots. When washing, clean the chamber thoroughly as well.

The vanes and rotor exposed.
Now check for any blemishes or signs of roughness inside the chamber. Use a fine grit piece of sandpaper to remove any roughness and to clean up the slots to ensure vanes can slide in and out freely once replaced. Avoid leaving the chamber and rotor separated for long periods as rust will quickly start to form leaving the chamber rough and in need of further cleaning with sandpaper or a flap wheel.
7. Vane replacement
Once the slots are cleaned and sanded the next step is to fit the new vanes. Before doing so, rub the vanes lightly with pump oil and make sure they can slide freely once seated. Vanes that stick or are tight will only cause the pump to run incorrectly or cause damage, so it’s vital that this step is done correctly.

Clean the pump chamber and remove any roughness with fine sand paper.
Once vanes are fitted, the rebuild process is simply a reverse of the strip down. Our advice is to make sure all surfaces are clean and dry and replace all seals and gaskets to prevent leaks afterwards. When refitting new gaskets, ensure the old gaskets are fully removed and the surface is clean to allow for a good seal. Once reassembled, refill the gearbox with fresh oil such as SAE 90, or whatever is recommended by the manufacturer. Then, refill the pump oiler with a clean light oil such as hydraulic oil, or as recommended by the manufacturer.
Once fully reassembled, turn the pump by hand for a number of rotations to ensure everything is correctly seated and working. Now remount the pump to the tanker’s drawbar and refit any components initially removed.




SHARING OPTIONS