As spring calving moves into full swing over the coming weeks, most farmers will be hoping for a problem-free calving period.
The vast majority of cows will calve on their own, but when assistance is required, it is important to avoid getting over-anxious and rushing the cow.
Your good intentions will only create problems at calving time.
Outlined below are a series of tips to remember on the occasions when you are required to step in and assist the delivery of a newborn calf.
Keep calm
The best thing any farmer can do when calving a cow is to keep calm and try not to rush the process.
When cows are calving late at night or in early morning, the natural tendency is to step in and pull the calf.
While this is fine in practice, just make sure that the cow has fully dilated and opened properly before you start to pull the calf. Pulling the calf too soon will create more problems than it will solve.
Move the cow to a proper calving pen
When you do see a cow calving and no progress is being made, move the animal to a purpose-built pen with a secure head restraint and calving gate.

When assisting a cow, move the animal to a purpose-built calving pen as the cow can be properly restrained for both the safety of the farmer and animal.
This is for your own safety and that of the animal. Once safely restrained, you can then check the position of the calf inside the cow.
If both feet and head are being presented in the normal position and there is room to run your hand around the calf’s head and shoulders inside the cow’s pelvis, the animal may just need more time, so leave alone for another 30 minutes to an hour.
If there is a mal-presentation, then this is the point to correct it. When checking the position of the calf, if the feet feel bigger than normal or the front legs are crossed, you should consider at this point calving for assistance.
How long do I wait?
For mature cows, it is advisable to leave at least two hours from the presentation of the water bag before checking on the cow.
If cows are calving to the same stock bull every year, you are better placed to make a call on whether the cow will calve unaided if left alone.
For heifers, you can step in and check progress every hour from presenting the water bag.
Apply plenty of lubricant
Before trying to pull the calf, make sure you put on a plastic glove and apply a proper calving lubricant sparingly around the inside of the cow and over the head of the cow.
Using the tubing from an old stomach tube with a large syringe can help get lube behind the calf’s head and shoulder. Make sure than this tube is sterile before using.
Attaching ropes
Use clean, coloured ropes so that they can be co-ordinated to specific feet, eg red rope on the right foot and blue on the left. This way you know which leg is being pulled forward once ropes are attached to the jack.
Loop the rope above the calf’s fetlock and, if possible, place a second loop just below the fetlock, as this can spread the pressure from the jack. Keep the loop knot below the calf’s foot.
Head ropes
Head ropes can be a help, but can also be a hindrance. If using a head rope to correct the head, then focus on completing this task before trying to work with feet.
Place the rope around the crown of the head and through the calf’s mouth to help straighten the head.
Once the head position has been corrected, slacken the rope or remove completely and only attach the feet ropes to the jack.
Try pulling manually first
Once you have corrected the position of the calf and applied feet ropes, try pulling the calf manually first.
Pull the calf until the head and feet are clear of the cow, then change the direction of the pull to a downward direction to help the calf slip out.
Apply the jack
If the calf is not coming, then apply the jack and attach the ropes. Once attached, work the ratchet to take up the slack on the ropes.
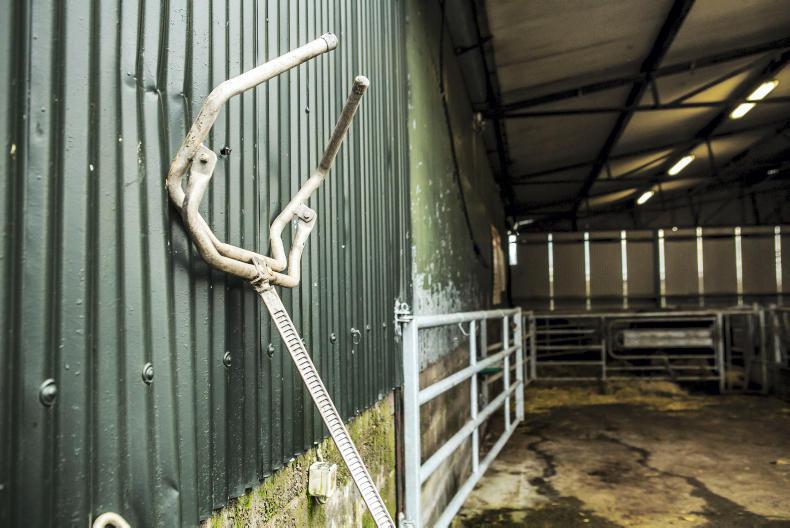
Incorrect use of the calving jack can injure the calf and cow. (photo: Phill Doyle)
As a rule of thumb, you should be able to touch both ropes together when you start to put tension on attached to the jack. If not, release the tension to ease the pressure.
Work with the cow
As mentioned in the first step, keep calm and work with the cow. Start with the jack in a straight position and slowly pull the calf until you start to feel pressure or resistance.

Knowing how to work with the cow during labour will increase the chances of getting live calves on the ground.
At this point, you should try to use the jack as a lever. Work the jack in a continuous, smooth, downward motion every time the cow pushes.
Between each contraction, straighten the jack and take up the slack on the ratchet.
Keep to the left hand side of the jack at all times, in case the cow goes down, to prevent being trapped against the wall.
Slacken the jack if the calf is stuck
If the calf is coming OK, but gets stuck at the hips, release the tension on the jack so that the ropes are not pulling and stretching the calf out.
This will allow the calf to breathe properly, whereas, in the stretched position, the animal will not be able to take in oxygen properly.
If the cow is down at this point, try rotating the calf or changing the angle of the jack to a sideways pull as this may help to bring the hips through the pelvis.
Read more
Tullamore Farm: calving cows and hitting targets
Watch: two years of work beginning to take shape
As spring calving moves into full swing over the coming weeks, most farmers will be hoping for a problem-free calving period.
The vast majority of cows will calve on their own, but when assistance is required, it is important to avoid getting over-anxious and rushing the cow.
Your good intentions will only create problems at calving time.
Outlined below are a series of tips to remember on the occasions when you are required to step in and assist the delivery of a newborn calf.
Keep calm
The best thing any farmer can do when calving a cow is to keep calm and try not to rush the process.
When cows are calving late at night or in early morning, the natural tendency is to step in and pull the calf.
While this is fine in practice, just make sure that the cow has fully dilated and opened properly before you start to pull the calf. Pulling the calf too soon will create more problems than it will solve.
Move the cow to a proper calving pen
When you do see a cow calving and no progress is being made, move the animal to a purpose-built pen with a secure head restraint and calving gate.

When assisting a cow, move the animal to a purpose-built calving pen as the cow can be properly restrained for both the safety of the farmer and animal.
This is for your own safety and that of the animal. Once safely restrained, you can then check the position of the calf inside the cow.
If both feet and head are being presented in the normal position and there is room to run your hand around the calf’s head and shoulders inside the cow’s pelvis, the animal may just need more time, so leave alone for another 30 minutes to an hour.
If there is a mal-presentation, then this is the point to correct it. When checking the position of the calf, if the feet feel bigger than normal or the front legs are crossed, you should consider at this point calving for assistance.
How long do I wait?
For mature cows, it is advisable to leave at least two hours from the presentation of the water bag before checking on the cow.
If cows are calving to the same stock bull every year, you are better placed to make a call on whether the cow will calve unaided if left alone.
For heifers, you can step in and check progress every hour from presenting the water bag.
Apply plenty of lubricant
Before trying to pull the calf, make sure you put on a plastic glove and apply a proper calving lubricant sparingly around the inside of the cow and over the head of the cow.
Using the tubing from an old stomach tube with a large syringe can help get lube behind the calf’s head and shoulder. Make sure than this tube is sterile before using.
Attaching ropes
Use clean, coloured ropes so that they can be co-ordinated to specific feet, eg red rope on the right foot and blue on the left. This way you know which leg is being pulled forward once ropes are attached to the jack.
Loop the rope above the calf’s fetlock and, if possible, place a second loop just below the fetlock, as this can spread the pressure from the jack. Keep the loop knot below the calf’s foot.
Head ropes
Head ropes can be a help, but can also be a hindrance. If using a head rope to correct the head, then focus on completing this task before trying to work with feet.
Place the rope around the crown of the head and through the calf’s mouth to help straighten the head.
Once the head position has been corrected, slacken the rope or remove completely and only attach the feet ropes to the jack.
Try pulling manually first
Once you have corrected the position of the calf and applied feet ropes, try pulling the calf manually first.
Pull the calf until the head and feet are clear of the cow, then change the direction of the pull to a downward direction to help the calf slip out.
Apply the jack
If the calf is not coming, then apply the jack and attach the ropes. Once attached, work the ratchet to take up the slack on the ropes.

Incorrect use of the calving jack can injure the calf and cow. (photo: Phill Doyle)
As a rule of thumb, you should be able to touch both ropes together when you start to put tension on attached to the jack. If not, release the tension to ease the pressure.
Work with the cow
As mentioned in the first step, keep calm and work with the cow. Start with the jack in a straight position and slowly pull the calf until you start to feel pressure or resistance.

Knowing how to work with the cow during labour will increase the chances of getting live calves on the ground.
At this point, you should try to use the jack as a lever. Work the jack in a continuous, smooth, downward motion every time the cow pushes.
Between each contraction, straighten the jack and take up the slack on the ratchet.
Keep to the left hand side of the jack at all times, in case the cow goes down, to prevent being trapped against the wall.
Slacken the jack if the calf is stuck
If the calf is coming OK, but gets stuck at the hips, release the tension on the jack so that the ropes are not pulling and stretching the calf out.
This will allow the calf to breathe properly, whereas, in the stretched position, the animal will not be able to take in oxygen properly.
If the cow is down at this point, try rotating the calf or changing the angle of the jack to a sideways pull as this may help to bring the hips through the pelvis.
Read more
Tullamore Farm: calving cows and hitting targets
Watch: two years of work beginning to take shape




SHARING OPTIONS