The reader loyalty code gives you full access to the site from when you enter it until the following Wednesday at 9pm. Find your unique code on the back page of Irish Country Living every week.
CODE ACCEPTED
You have full access to farmersjournal.ie on this browser until 9pm next Wednesday. Thank you for buying the paper and using the code.
CODE NOT VALID
Please try again or contact us.
For assistance, call 01 4199525
or email subs@farmersjournal.ie
If would like to speak to a member of our team, please call us on 01-4199525
Reset password
Please enter your email address and we will send you a link to reset your password
If would like to speak to a member of our team, please call us on 01-4199525
Link sent to your email address
We have sent an email to your address.
Please click on the link in this email to reset
your password. If you can't find it in your inbox,
please check your spam folder. If you can't
find the email, please call us on 01-4199525.
Email address not recognised
There is no subscription associated with this email
address. To read our subscriber-only content.
please subscribe or use the reader loyalty code.
This content is available to digital subscribers and loyalty code users only. Sign in to your account, use the code or subscribe to get unlimited access.
This content is available to digital subscribers and loyalty code users only. Sign in to your account, use the code or subscribe to get unlimited access.
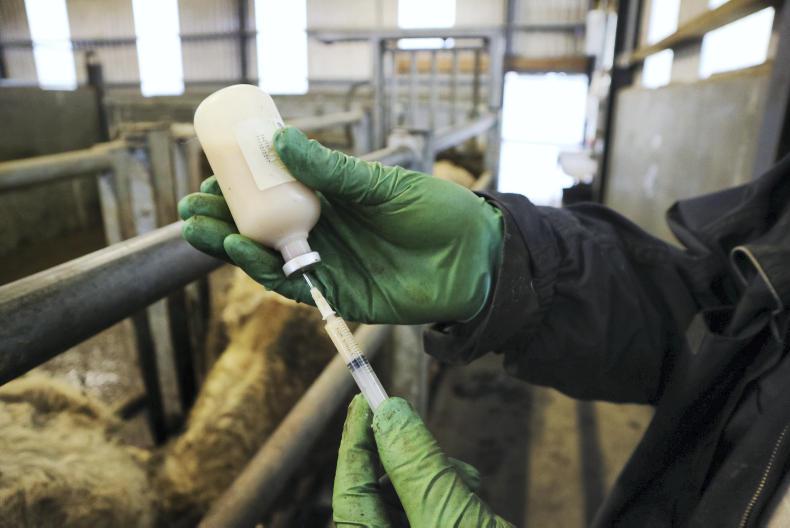
Step 1: Establish how the product is administered (intramuscularly (IM)/subcutaneously (SC)), correct dosage rates and what type of needle should be used.
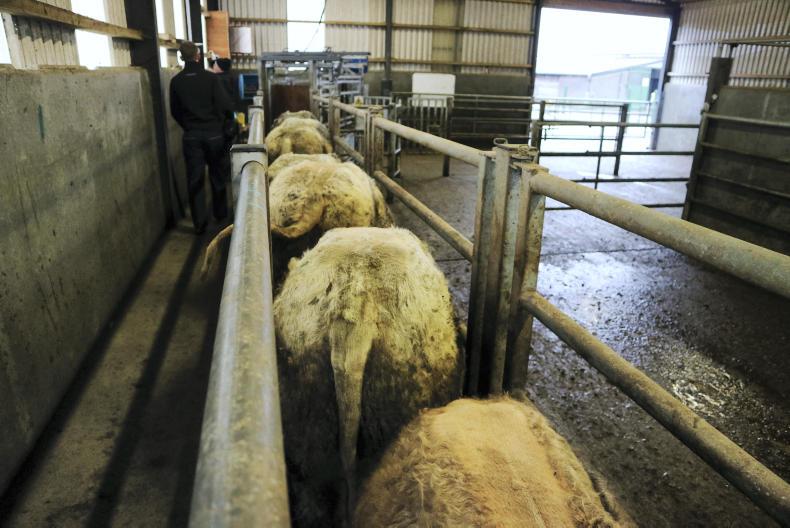
Step 2 (pic 1): fill chute relatively tightly for SC injections.
Step 2 (pic 2) Headgate and restraint will be required for IM injections.
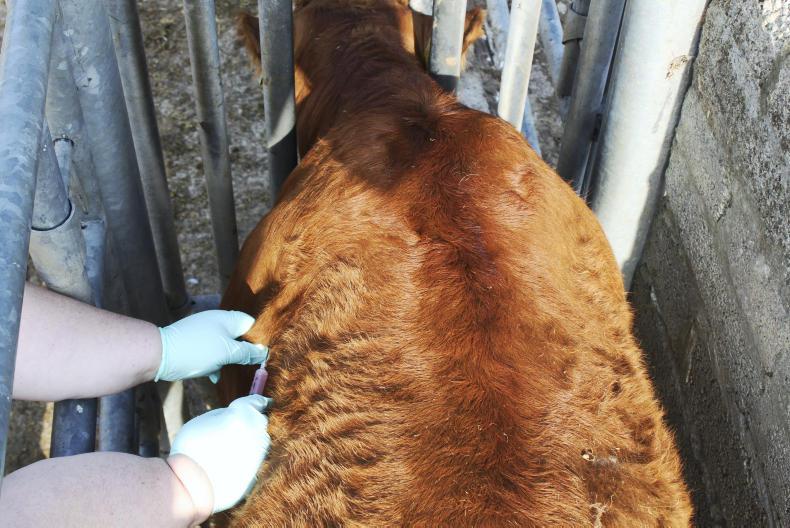
Step 3: Wear gloves and target a clean injection site.
Step 4 (pic 1): For SC injections, pull the skin behind the front shoulder tightly to make a fold.
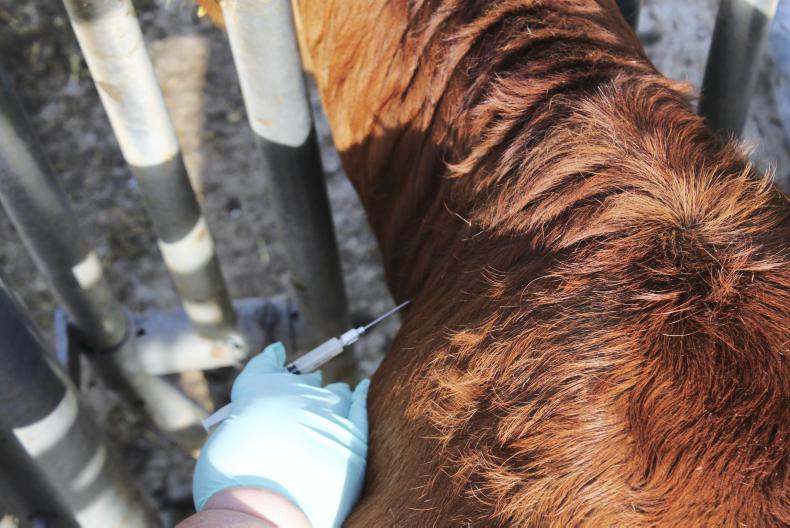
Step 4 (pic 2): IM injections should be administered at a 90 degree angle into the neck.
When injecting cattle, we want to avoid any adverse effect on our own health and safety, ensuring that our vaccination or remedy fulfils its purpose and that there aren’t any sinister traces of our intervention left in the animal at processing.
When injecting cattle, we want to avoid any adverse effect on our own health and safety, ensuring that our vaccination or remedy fulfils its purpose and that there aren’t any sinister traces of our intervention left in the animal at processing.
1
Before an animal is touched, we should get to know our product and set ourselves up correctly. By no means do we need to burn the midnight oil over the product labels. But, we should know where the drug goes (subcutaneous/SC or intramuscular/IM), how much of it we are giving and have the correct equipment at hand. Needle size is a common issue. If it’s an IM product, opt for a 1.5in (length) needle, and a shorter one inch needle for SC injections. Gauge refers to diameter, with a smaller number indicating a wider needle. Your vet will ultimately advise on this when selling the product. Generally, 16 or 18 gauge needles are recommended for cattle with the wider (16) option used for mature (thicker skinned) animals or when thick solutions are being injected. In small animals (<150kg), 20-gauge needles are often used. Again, your vet will know best.
2
Once it’s established where the injection is going (SC or IM), restrain animals accordingly. If it’s an SC product, fill the chute tight enough so cattle cannot move forwards or backwards, but obviously not tight enough for there to be a risk of injury to the animal.
With IM injections, we really need a headgate and should ideally have a head scoop too. This injection is going into the animal’s neck and allowing the animal have unrestricted head movement is playing with fire. I have seen arm bones snap like twigs against crush bars where IM injections were attempted along the chute.
Not to mention the inevitable broken needles, dropped syringes and wasted medicine. Injecting guns are commonplace now, but, while handy, they still carry big risks.
3
An in-out stabbing action is no way to inject cattle and we’re still in danger from a head-butt.
Keep it clean. Wear gloves and pick a clean injection site on the animal. For SC injections, the ideal target is behind the front shoulder where the skin is slightly loose. Pick the clean side of the animal, but avoid going in at the same site as a recent injection. As stated above, IM injections should go to the neck. At all costs, avoid IM injecting cattle in the rump area. Chances are it’ll be dirtier than the neck and hence our risk of infection is higher than with the neck. In addition, the beef cuts here are higher value than at the neck. A dirty needle will leave behind an internal abscess, devaluing the beef itself.
For treatments based on weight, alter dosage accordingly. Don’t adopt a one-size-fits-all approach. Guidelines are there for a reason – certain parasite doses are quite hard on an animal and we can actually do more harm than good if overdosing, and obviously not provide enough cover when skimping.
4
When going SC (1), pull the skin behind the shoulder tightly to create a fold. Insert the needle into the hollow of the fold, ensuring that it doesn’t come out the other side, and administer the injection. Rub the area vigorously with a clean, gloved hand afterwards – this encourages the needle wound to close and helps prevent infection.
With IM injections (2), the needle should be inserted at a 90° angle, directly into the animal’s neck. Depending on the facility and animal’s position, the injection can be administered behind the headgate provided it is going in to a clean, tight-skinned muscular area along the neck and not loose tissue at the shoulder. If this isn’t possible, restrain the animal using a headscoop, halter or have another person use a nose ring and inject in front of the headgate. Again, rub the site vigorously after.
5
Needles should be changed regularly when working through large groups of cattle. If overused, they can become blunt and increase the chances of infection and abscesses. There is no exact guide figure, but a new needle every 10-15 head is good practice. If a needle is dropped or becomes dirty, it should be immediately changed. Cap needles before disposal and use a purpose-built yellow sharps bin. Those in the Quality Assurance Scheme must have one on-site.
The blatant flouting of vaccination protocols by people who have engineered vaccines for themselves has disgusted Katherine O’Leary. The vulnerable people in our lives are being done and this is how i
In the two years following the change to Bovipast RSP, we lost just one animal out of 2,000 finished on the farm. We are thrilled beyond belief,” said north Cork intensive beef finisher Michael Bourke
Save to a collection
Recent collections
This article has already been saved
This article has been saved
Create a collection
Subscriber only
This content is available to digital subscribers only. Sign in to your account or subscribe to get unlimited access.SIGN INSUBSCRIBE


 This is a subscriber-only article


SHARING OPTIONS: