Not only will these appliqué blocks form the centre piece of your quilt, they will also give you the chance to make it truly unique or to personalise it for a lucky recipient.
If it is for a young person, you could try looking through some colouring books and pick themes like transport, baby animals, Disney characters, outer space, toys etc. If it is for a young teenager consider themes like clothes, sports, music, travel, baking etc. If you are gifting your quilt to a sibling, parent or friend how about choosing motifs with a garden, home, floral, vintage or country theme?
I embroidered my blocks for my original quilt on my sewing machine using a Sunbonnet Sue and Fisherman Sam theme, which I purchased on the internet and was able to download and transfer to the machine. Here, I demonstrate the appliqué technique with a perfume bottle motif.
Once you have decided on a theme you need to choose six motifs, one for each block. Choose a motif with a simple outline bearing in mind that you will be applying this to your background fabric later. It needs to sit comfortably on a background square measuring 9” by 9” when finished in your quilt.
NOTE: Finished size of quilt 74” by 96”.
• Finished block size in quilt 13” x 13”.• Total number of blocks required: 6• ¼” seam allowance required throughout.Requirements
· Six pieces of background fabric measuring 10” by 10” square.
Assorted fabrics for your appliqué motifs
Assorted strips of fabric, twelve measuring 2½” by 9” and twelve measuring 2½” by 13½”
Double sided fusible web
Pen
Coordinating background fabric thread
General sewing supplies
Directions
Fusible-Web Machine Sewn Appliqué – we have looked at this quick and simple method before, but just to recap:
Draw appliqué motif onto paper side of fusible web, remembering to reverse image if necessary.
Cut out each shape roughly leaving at least ¼” all around the edge.
Peel off the paper and iron onto back of appliqué fabric.
Cut out motif on the drawn line then remove paper backing.
Fold background fabric into quarters and finger press to create placement guidelines. Use the creased lines to centre your motif onto the background fabric and fuse in place using a hot dry iron.
Using zigzag or blanket stitch on your sewing machine sew around edge of each appliqué motif to secure. Press. Repeat for five more blocks.Alternative technique
Broderie Perse (also hand method) – originally, the Broderie Perse technique was a combination of appliqué and embroidery whereby printed elements from chintz fabric (usually flowers, birds or animals) were cut and appliquéd to a plain background fabric, forming an image or scene. For example instead of creating a flower out of multiple pieces of fabric you would cut the whole flower and appliqué this instead. With such a huge range of printed fabric motifs available today this technique would be very suitable, fusing fabric cut outs to a background and placing them in our quilt.
Finishing the
appliquéd blocks
Once the blocks have been appliquéd using your preferred method, you are ready to add the borders to each block. For variety I finished four blocks one way and two another.
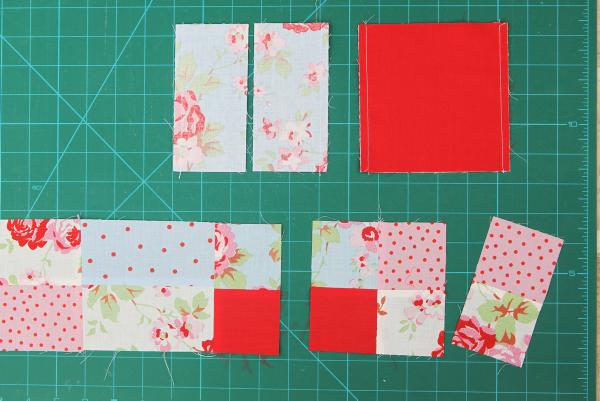
Cut each block down to 9½” by 9½ ” square.For each block use two strips 2½” by 9 ½” and two strips 2½” by 13 ½”.
Add the shorter strips to the top and bottom of four of the blocks using a ¼” seam and pressing seam allowances out from the centre.
Add the longer strips to each side of these four blocks again using ¼” seam allowance and pressing seam allowances out from the centre.Add the shorter strips to each side of the last two blocks and the longer strips to the top and bottom.Leave all six blocks to one side ready for assembly next week when we look at finishing these two panels in our quilt.NEXT WEEK: Appliqué panel assembly and patchwork squares.
Not only will these appliqué blocks form the centre piece of your quilt, they will also give you the chance to make it truly unique or to personalise it for a lucky recipient.
If it is for a young person, you could try looking through some colouring books and pick themes like transport, baby animals, Disney characters, outer space, toys etc. If it is for a young teenager consider themes like clothes, sports, music, travel, baking etc. If you are gifting your quilt to a sibling, parent or friend how about choosing motifs with a garden, home, floral, vintage or country theme?
I embroidered my blocks for my original quilt on my sewing machine using a Sunbonnet Sue and Fisherman Sam theme, which I purchased on the internet and was able to download and transfer to the machine. Here, I demonstrate the appliqué technique with a perfume bottle motif.
Once you have decided on a theme you need to choose six motifs, one for each block. Choose a motif with a simple outline bearing in mind that you will be applying this to your background fabric later. It needs to sit comfortably on a background square measuring 9” by 9” when finished in your quilt.
NOTE: Finished size of quilt 74” by 96”.
• Finished block size in quilt 13” x 13”.• Total number of blocks required: 6• ¼” seam allowance required throughout.Requirements
· Six pieces of background fabric measuring 10” by 10” square.
Assorted fabrics for your appliqué motifs
Assorted strips of fabric, twelve measuring 2½” by 9” and twelve measuring 2½” by 13½”
Double sided fusible web
Pen
Coordinating background fabric thread
General sewing supplies
Directions
Fusible-Web Machine Sewn Appliqué – we have looked at this quick and simple method before, but just to recap:
Draw appliqué motif onto paper side of fusible web, remembering to reverse image if necessary.
Cut out each shape roughly leaving at least ¼” all around the edge.
Peel off the paper and iron onto back of appliqué fabric.
Cut out motif on the drawn line then remove paper backing.
Fold background fabric into quarters and finger press to create placement guidelines. Use the creased lines to centre your motif onto the background fabric and fuse in place using a hot dry iron.
Using zigzag or blanket stitch on your sewing machine sew around edge of each appliqué motif to secure. Press. Repeat for five more blocks.Alternative technique
Broderie Perse (also hand method) – originally, the Broderie Perse technique was a combination of appliqué and embroidery whereby printed elements from chintz fabric (usually flowers, birds or animals) were cut and appliquéd to a plain background fabric, forming an image or scene. For example instead of creating a flower out of multiple pieces of fabric you would cut the whole flower and appliqué this instead. With such a huge range of printed fabric motifs available today this technique would be very suitable, fusing fabric cut outs to a background and placing them in our quilt.
Finishing the
appliquéd blocks
Once the blocks have been appliquéd using your preferred method, you are ready to add the borders to each block. For variety I finished four blocks one way and two another.
Cut each block down to 9½” by 9½ ” square.For each block use two strips 2½” by 9 ½” and two strips 2½” by 13 ½”.
Add the shorter strips to the top and bottom of four of the blocks using a ¼” seam and pressing seam allowances out from the centre.
Add the longer strips to each side of these four blocks again using ¼” seam allowance and pressing seam allowances out from the centre.Add the shorter strips to each side of the last two blocks and the longer strips to the top and bottom.Leave all six blocks to one side ready for assembly next week when we look at finishing these two panels in our quilt.NEXT WEEK: Appliqué panel assembly and patchwork squares.


SHARING OPTIONS