For the majority of cows, calving involves moving them to a freshly bedded calving pen at least a few hours before the event and simply spectating from a distance.
The number of cows that need to be assisted should be quite low.
However, at calving time you need to be on hand should such a need arise.
Animals that are most likely to need assistance include first-calved heifers, cows in either too much or too poor condition and cows that are known to have been mated to a harder-calving bull.
Give her time
A vet once told me: “Give the cow time, time and more time, and when you think you have given her long enough, give her another 20 minutes.” Allowing the cow sufficient time to dilate and prepare for calving is really important.
It is natural for a cow to want to find a quiet spot away from all other animals to have her calf.
This is why calving pens should be away from as much noise and activity as possible. When you see a cow starting to get sick to calve, the best thing you can do is stay away.
Often, when you enter the shed to see how she is doing, the cow will get up from calving in response to your presence.
This can put her off calving and disrupt her progress, which is why a calving camera is a brilliant addition to any calving shed. It allows the farmer to monitor and observe without disturbing the cow.
Some farmers like to handle a cow early on to see if the calf is presented correctly, but this can disrupt the natural progression of the calving, which can then be interpreted by the farmer as a cow needing help. The best approach is to only handle the cow if she is not making any progress.
When everything is correct, there should be constant signs of progression in the calving.
From the cow getting sick, to the passing of the water bag, to the presentation of two feet, to the actual calving itself.
It is when this progress stops for a period of time that we must consider intervening.
If there are no feet presented after the water bag, or you see a cow forcing hard for a prolonged period without making any headway, then it’s time to take a look.
If you find a cow calving first thing in the morning and you are unsure how long she has been calving for, a good way of knowing if it is time to intervene is by the colour of the fluid in the water bag, where it is still intact.
If the fluid is clear, it is a sign the calf is not under any pressure. If the fluid is cloudy or has a yellow/brown tinge, it indicates that the meconium (the calf’s first manure) has been passed and it is probably time to intervene.
Assisting with calving
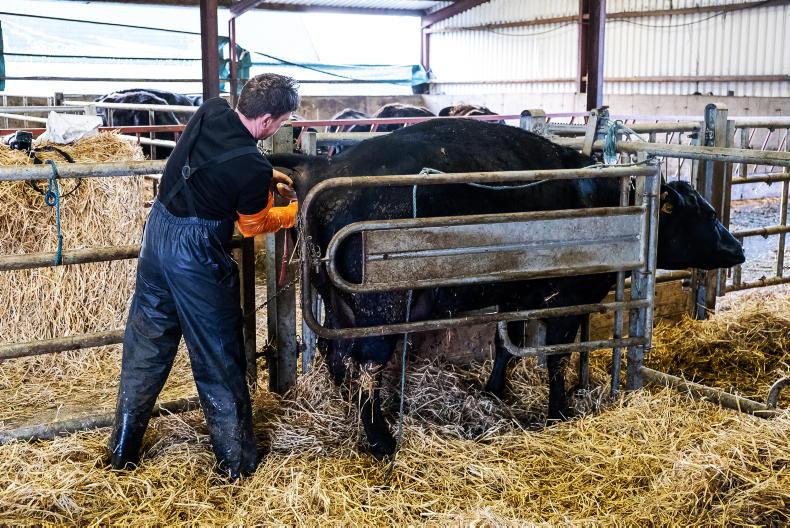
First and most foremost, think of your own safety. Get the cow into the calving gate to assess the situation. Remember cleanliness and hygiene – handling a cow increases the risk of infection post-calving.
While wearing calving gloves can reduce your sense of touch and feel, a good trick to improve this is to wear a pair of latex gloves over the calving gloves.
Check to see that the two front feet are present and that the head is up and resting between the two legs.
Have a feel around the pelvic area to assess how big the calf is or how tight the calving may be.
Always use a good-quality calving lubricant when you handle a cow. Using household soaps is not recommended, as they can irritate the inside of the cow and do not last as long as purpose-made lubricants. Remember, an ounce of lubrication is worth one tonne of pressure.
Work the lube right around the calf and back onto the shoulders if possible, as this will be a pinch point in many calvings.
Making the call
After the initial assessment and prior to pulling the calf, ask yourself the question: am I confident I can get the calf out on my own?
If the answer is no, then you need to call for assistance. It is better to stop and get help at this point while time is still on your side.
When you feel you are able to proceed, place the ropes on the calf’s legs.
A new calving season should always start with a new set of calving ropes. Old ropes become hardened and can cause injury to the calf’s leg.
Coloured ropes are much better than the white ones, firstly because they are easy to find in the straw if you drop them, and secondly, you know which leg they are placed on. Always place the red rope on the right leg (R and R) and the blue rope on the left leg. This helps avoid getting the legs crossed when putting the ropes on the jack.
The ropes should always be placed above the fetlock (wrist joint) of the calf.
Pulling below this point significantly increases the chance of injury. Pulling on the ropes yourself without any jack may be enough to give you an indication as to whether or not to proceed with the pull.
Calving jack
The calving jack is a super tool when used correctly, but dangerous in the wrong hands. Where it is used, you should always be working with the cow. When she forces, put a pull on the jack. If she stops, release the pressure on the ropes for a minute until she goes again.
Jacking the calf can take a number of minutes to complete. You do not need to get it out in one fell swoop.
When you maintain the pressure on the ropes, it stretches out the calf.
In this position, it is very difficult for the calf to breathe. Releasing the ropes takes the pressure off and allows the calf to take a few breaths.
Ensure there is a deep bed of straw under the cow for the calf to fall out on to.
Once out, remove the jack from the calving pen and take off the ropes. Put the calf into a natural sitting position, with its front legs tucked in under it, as this opens up the chest and maximises airflow.
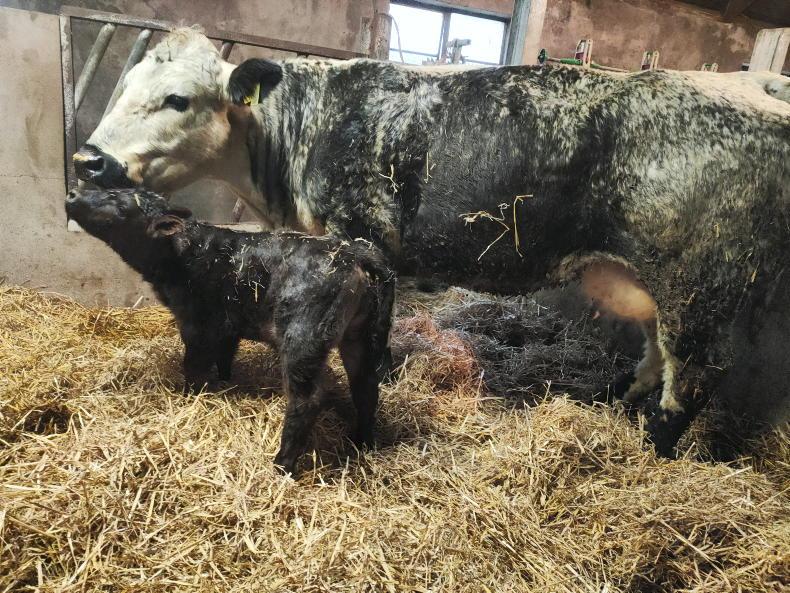
If all is well, the best thing to do is to get out of the pen and release the cow so that she can lick and bond with the calf.
Give cows plenty of time to calve themselves – going in too soon can cause damage to both cow and calf.Look for progress – while every cow is different, there should be constant progression throughout the process.When progress stops, it is time to intervene.Have calving aids clean and ready to use.Think safety – have a secure headgate to lock the cow in prior to entering the pen.Work with the cow – when she is pushing, pull on the ropes.Take your time – as long as the calf is not stuck at the chest, stopping pulling will allow the calf to breathe.Exit the calving pen before releasing the cow from the calving gate.
For the majority of cows, calving involves moving them to a freshly bedded calving pen at least a few hours before the event and simply spectating from a distance.
The number of cows that need to be assisted should be quite low.
However, at calving time you need to be on hand should such a need arise.
Animals that are most likely to need assistance include first-calved heifers, cows in either too much or too poor condition and cows that are known to have been mated to a harder-calving bull.
Give her time
A vet once told me: “Give the cow time, time and more time, and when you think you have given her long enough, give her another 20 minutes.” Allowing the cow sufficient time to dilate and prepare for calving is really important.
It is natural for a cow to want to find a quiet spot away from all other animals to have her calf.
This is why calving pens should be away from as much noise and activity as possible. When you see a cow starting to get sick to calve, the best thing you can do is stay away.
Often, when you enter the shed to see how she is doing, the cow will get up from calving in response to your presence.
This can put her off calving and disrupt her progress, which is why a calving camera is a brilliant addition to any calving shed. It allows the farmer to monitor and observe without disturbing the cow.
Some farmers like to handle a cow early on to see if the calf is presented correctly, but this can disrupt the natural progression of the calving, which can then be interpreted by the farmer as a cow needing help. The best approach is to only handle the cow if she is not making any progress.
When everything is correct, there should be constant signs of progression in the calving.
From the cow getting sick, to the passing of the water bag, to the presentation of two feet, to the actual calving itself.
It is when this progress stops for a period of time that we must consider intervening.
If there are no feet presented after the water bag, or you see a cow forcing hard for a prolonged period without making any headway, then it’s time to take a look.
If you find a cow calving first thing in the morning and you are unsure how long she has been calving for, a good way of knowing if it is time to intervene is by the colour of the fluid in the water bag, where it is still intact.
If the fluid is clear, it is a sign the calf is not under any pressure. If the fluid is cloudy or has a yellow/brown tinge, it indicates that the meconium (the calf’s first manure) has been passed and it is probably time to intervene.
Assisting with calving
First and most foremost, think of your own safety. Get the cow into the calving gate to assess the situation. Remember cleanliness and hygiene – handling a cow increases the risk of infection post-calving.
While wearing calving gloves can reduce your sense of touch and feel, a good trick to improve this is to wear a pair of latex gloves over the calving gloves.
Check to see that the two front feet are present and that the head is up and resting between the two legs.
Have a feel around the pelvic area to assess how big the calf is or how tight the calving may be.
Always use a good-quality calving lubricant when you handle a cow. Using household soaps is not recommended, as they can irritate the inside of the cow and do not last as long as purpose-made lubricants. Remember, an ounce of lubrication is worth one tonne of pressure.
Work the lube right around the calf and back onto the shoulders if possible, as this will be a pinch point in many calvings.
Making the call
After the initial assessment and prior to pulling the calf, ask yourself the question: am I confident I can get the calf out on my own?
If the answer is no, then you need to call for assistance. It is better to stop and get help at this point while time is still on your side.
When you feel you are able to proceed, place the ropes on the calf’s legs.
A new calving season should always start with a new set of calving ropes. Old ropes become hardened and can cause injury to the calf’s leg.
Coloured ropes are much better than the white ones, firstly because they are easy to find in the straw if you drop them, and secondly, you know which leg they are placed on. Always place the red rope on the right leg (R and R) and the blue rope on the left leg. This helps avoid getting the legs crossed when putting the ropes on the jack.
The ropes should always be placed above the fetlock (wrist joint) of the calf.
Pulling below this point significantly increases the chance of injury. Pulling on the ropes yourself without any jack may be enough to give you an indication as to whether or not to proceed with the pull.
Calving jack
The calving jack is a super tool when used correctly, but dangerous in the wrong hands. Where it is used, you should always be working with the cow. When she forces, put a pull on the jack. If she stops, release the pressure on the ropes for a minute until she goes again.
Jacking the calf can take a number of minutes to complete. You do not need to get it out in one fell swoop.
When you maintain the pressure on the ropes, it stretches out the calf.
In this position, it is very difficult for the calf to breathe. Releasing the ropes takes the pressure off and allows the calf to take a few breaths.
Ensure there is a deep bed of straw under the cow for the calf to fall out on to.
Once out, remove the jack from the calving pen and take off the ropes. Put the calf into a natural sitting position, with its front legs tucked in under it, as this opens up the chest and maximises airflow.
If all is well, the best thing to do is to get out of the pen and release the cow so that she can lick and bond with the calf.
Give cows plenty of time to calve themselves – going in too soon can cause damage to both cow and calf.Look for progress – while every cow is different, there should be constant progression throughout the process.When progress stops, it is time to intervene.Have calving aids clean and ready to use.Think safety – have a secure headgate to lock the cow in prior to entering the pen.Work with the cow – when she is pushing, pull on the ropes.Take your time – as long as the calf is not stuck at the chest, stopping pulling will allow the calf to breathe.Exit the calving pen before releasing the cow from the calving gate. 


SHARING OPTIONS