

Many, many years ago, a housewife from Nanaimo, British Columbia (near the city of Vancouver) in Canada entered a magazine's recipe competition. These magazine recipe competitions were common in my native Canada back in the day, and I'm obsessed with the recipes these women (because at this time, it was only women partaking) would come up with – they are little bits of Canadian history you can enjoy just as much today as you could when they were first envisioned.
The particular recipe this fabled woman from Nanaimo submitted was good enough to land her first prize. She created a three-layer traybake packed with chocolate and a light buttercream filling. They soon became known as Nanaimo bars, and have since become an iconic Canadian food.
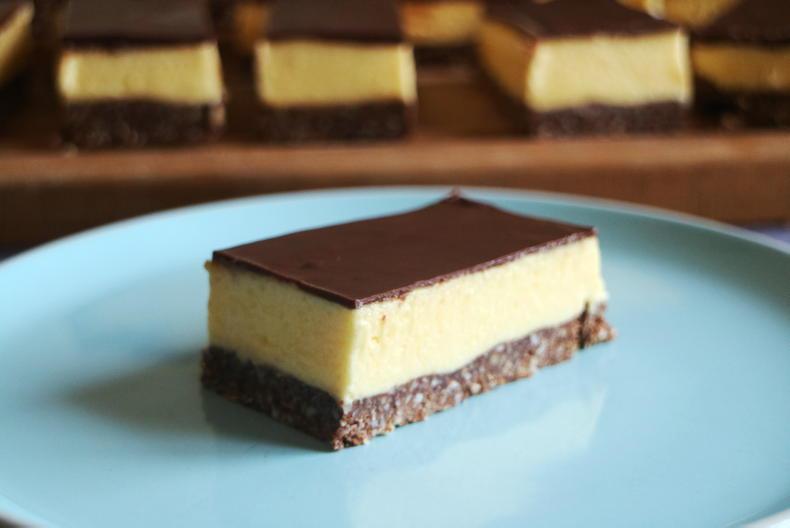
Sometimes the filling is green (and sometimes it's flavoured with mint) but traditionally, the buttercream filling is yellow in colour. This is because it's made with Bird's custard powder (it has to be the powder as opposed to actual custard; I found some in my local Dunnes Stores).
Recently, the New York Times shared a recipe for Nanaimo bars and Canadians around the globe responded in complete outrage – you see, they got the layer proportions very, very wrong. The base, which is crushed biscuits, melted butter, cocoa and a few other bits, should be thin. The middle buttercream layer should be thickest, and the chocolate coating on the top should be thin again. The New York Times made the base far too thick and the buttercream filling depressingly thin.
Here's my recipe (for correct proportions; see the video and photos).
Makes 24 bars
Ingredients
Base:
100g desicated coconut
200g finely crushed digestive biscuits
125g butter, melted
50g cocoa powder
50g caster sugar
100g finely chopped almonds
1 large egg, lightly beaten
Large pinch of sea salt
1 tsp vanilla
Filling:
125g softened butter
2 heaping tbsp Bird's custard powder
1 tsp vanilla
1kg icing sugar
200ml cream (more, if it's too thick to spread)
Top layer:
200g dark chocolate
60g butter
Directions:
1. Make the base: line a baking tray with parchment (make sure there's some overhanging the sides of the dish) and set aside.
2. In a saucepan, combine the butter, cocoa and caster sugar. Heat until everything is melted. While whisking constantly, slowly drizzle in the egg (make sure the heat is on low so the egg doesn't scramble). Mix well and, once thickened and smooth, take the mixture off the heat.
3. In a mixing bowl, combine the coconut, almonds and crushed biscuits. Add the vanilla and sea salt to the melted chocolate mixture and mix well. Pour the chocolate mixture over the crushed biscuit mixture and mix to combine.
4. Pour the base into the bottom of the lined baking tray and press firmly with your hands until the base is well-packed. Set aside.
5. Make the buttercream filling: in a large mixing bowl, add the custard powder, softened butter and vanilla. Using a hand mixer or stand mixer with the paddle attachment, beat these ingredients until light and fluffy. Slowly start adding in the icing sugar, mixing well after each addition. When the mixture starts to look dry and crumbly, start adding in the cream a little at a time, again mixing after each addition. Keep beating the buttercream until it's light, smooth and fluffy.
6. Pour the buttercream on top of the base and smooth out; completely covering the base. I use a small offset palette knife for this. Once the buttercream is smooth on top and completely covers the base, set aside.
7. Make the topping: in a microwave safe bowl, break up the dark chocolate into pieces and add the butter. Microwave at 20 second intervals, mixing after each 20 seconds, until the butter and chocolate have melted together and are smooth.
8. Carefully and evenly pour the melted chocolate over the buttercream filling. Again, gently spread the melted chocolate to cover the entire surface of the traybake. Once this is done, put the baking tray into the refrigerator for at least three hours.
9. Take the tray out of the fridge and, using the overhanging parchment on the sides, carefully remove the traybake from the tray. Cut into portions (you get nice, clean cuts when using a sharp knife dipped in hot water and dried with a towel) and enjoy. These keep best in the fridge until it's time to serve.
SHARING OPTIONS